Administrator Guide: Configuring Cost Book
Note: Cost Book is a licensed feature (FeatureConfiguration.CostBook). If the Cost Book menu item is not visible under Admin → Financials, the module is not enabled — contact Cora Systems to have it licensed/activated before proceeding.
Overview
Cost Book is an Advanced Financials module in Cora PPM used to track cost book lines, forecasting, and financial rollups at project level. Configuration lives under Admin → Financials → Cost Book and is organized into five tabs. This guide walks through prerequisites and the recommended configuration order.
Prerequisites
Before configuring Cost Book, confirm the following are already set up, as Cost Book screens reference them directly:
Prerequisite | Where to Configure | Why It's Needed |
|---|---|---|
Currency | Admin → Financials → Configuration → Currency tab | Cost Book values are currency-denominated. |
Account / AGL code hierarchy (Element of Cost, Account Groups/Sub Groups/Accounts) | Admin → Financials → Codes ( | Cost Book Registers and Attributes both map to Account Codes from this hierarchy. |
VAT Rate, Distribution Curves (if used) | Admin → Financials → Codes | Referenced by Cost Book forecasting/cashout behavior. |
Registers supplying Estimate/Budget values | Register / Smart Forms configuration | The Cost Book Submission tab points at these registers. |
Internal Order (optional) | Admin → Financials → Configuration | Required if you want “Add Internal Order to Account Code” available on the Columns Admin tab. |
Only users with the Administrator role can access these screens. The entire Financials admin group is restricted to Admin.
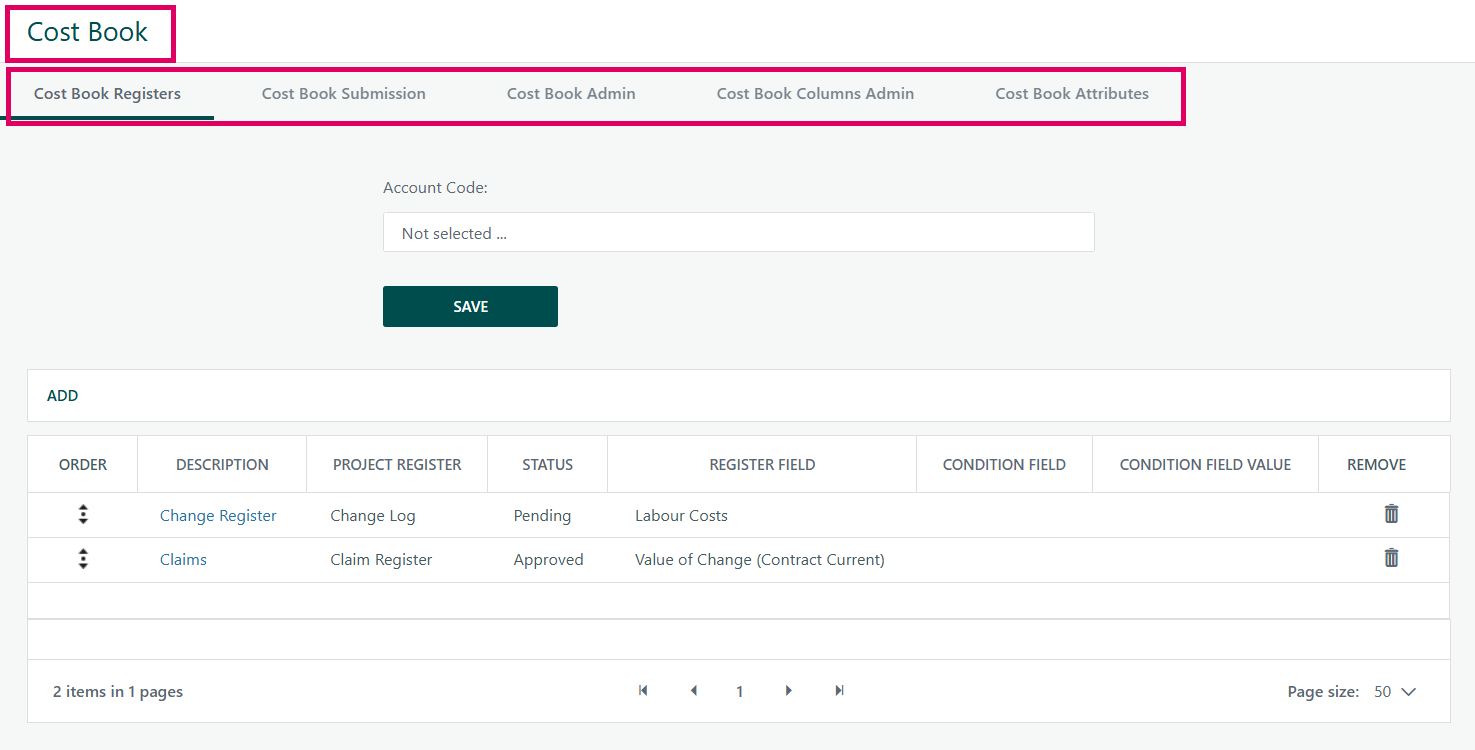
Step-by-Step Configuration
Navigate to Admin → Financials → Cost Book. Work through the tabs in the order below.
1. Cost Book Registers
Maps Account Codes to the project registers that feed Cost Book lines.
- Click Add to open the Register Details popup.
- Select the Account Code from the dropdown.
- Set the register name, description, and status.
- Optionally set a condition field/value to control when the register applies.
- Save. Repeat for each Account Code/register mapping needed. Rows can be drag-reordered afterward.
2. Cost Book Submission
Defines which registers supply Estimate and Budget values into the Cost Book.
- Select the source register from the Estimate dropdown.
- Select the source register from the Budget dropdown.
- Click Save.
3. Cost Book Admin
Core behavior settings for how Cost Book calculates and displays financials. This is the largest configuration screen — work through each section:
Section | Key Settings | Gotchas |
|---|---|---|
General |
| Confirm the reporting period before saving, as period changes can trigger recalculation. |
Toggles |
| Some toggles apply tenant-wide or affect existing Cost Book/PO lines. |
Direct Costs | “Direct Cost Committed Value is equal to Direct Cost Actual Value”. | System-wide impact. Only change this under guidance from Cora Systems. |
Actuals | “Add Down Payment to Actuals”. | System-wide impact. Only change this under guidance from Cora Systems. |
Forecasting Level |
| Once any project has already used a given level, that option locks and can no longer be changed for the tenant. |
Display |
| Display setting changes can trigger background financial recalculation. |
Cashout Forecast Profiling |
| Baseline selection requires the correct baseline date set. |
- Click Save.
Before Saving: Changing the Forecasting Level can retroactively delete Provisions & Adjustments values across all Cost Book/PO lines. Changing the Direct Cost commitment-vs-actual toggle bulk-updates that behavior tenant-wide. Changing the forecast display setting or period can trigger a background financial recalculation job. Confirm these changes with stakeholders before saving in a live environment.
4. Cost Book Columns Admin
Controls which columns appear, and in what order, across the various Cost Book screens. Each section is a swap-list: move columns between Available and Selected, then reorder.
Configure column layout for:
- Cost Book Left Panel
- Cost Book Right Panel (optionally check “Add Internal Order to Account Code” — only available if Internal Order is enabled)
- Cost Book Grid
- Cashout Forecast Left Panel
- Transactions tab — check “Display Transactions tab in the Cost Book” to reveal its column list
- PO Pop Up (optionally check “Display only PO Rows/Lines in Pop Up”)
- Invoice Pop Up
- Direct Cost Pop Up
Save each section as you go.
This is where PV/EV/AC and forecast-style variable columns are enabled and ordered for the on-screen Cost Book — separate from the Cost Book Portfolio Report column configuration, which is managed elsewhere.
5. Cost Book Attributes (Optional)
Lets you tag groups of Account Codes under a named attribute mapped to a Cost Book column — useful for custom groupings/reporting.
- Click Add.
- Enter a Description for the attribute.
- Select the Cost Book Column it maps to.
- Use the Account Code tree to multi-select the Account Codes this attribute covers.
- Save.
Post-Configuration Checklist
- Currency, AGL/Account codes, and any required registers exist and are correct
- Cost Book Registers map every relevant Account Code to its register
- Estimate and Budget source registers are set on the Submission tab
- Cost Book Admin settings reviewed with finance stakeholders, especially Forecasting Level and the two system-wide-impact toggles
- Column layouts configured for all relevant panels/pop-ups
- Attributes configured if custom grouping/reporting is required
Was this article helpful?
That’s Great!
Thank you for your feedback
Sorry! We couldn't be helpful
Thank you for your feedback
Feedback sent
We appreciate your effort and will try to fix the article