Workflow Configuration Guide for Administrators
How to build, test, and activate a new Workflow in Cora PPM.
Administrator note: Decide the workflow scope, approvers, escalation rules, and manager access before building. This reduces rework and prevents activation issues later.
Before You Start
Have these decided before you open the builder — it saves rework once you're in the diagram:
- What Record Type Is This For? Smart Form, Project Register, Project Request, Expense, Portfolio, Cost Book Estimate/Budget, a Financial type, Baseline Approval, Submit EAC, or Submit Forecast.
- Is There Already an Active Workflow For This Type? Most financial types allow only one active workflow at a time. Activating a new one will require retiring the old one. Smart Forms, Registers, and Project Requests allow one per template, so check the specific template, not just the type.
- Who Approves, and in What Order? Single approver per step, or a group that votes as a quorum.
- What Should Happen If Someone Doesn't Respond in Time? Auto-approve, auto-reject, auto-cancel, notify, or reassign.
- Who Should Be Able to Monitor and Intervene? Define Workflow Managers for live instances.
Step 1 — Open the Workflow List
Navigate to Admin > Workflow > Workflow List. This shows every workflow currently configured across the system, its type, and its status.
Step 2 — Start a New Workflow
Click Add. Set the basics:
Field | Guidance |
|---|---|
Name | Make it specific enough to identify at a glance later, such as Capital Budget Approval — Region East, not Workflow 3. |
Type | Select the record type this workflow will attach to. This is locked once set, so confirm it matches the scope from Before You Start. |
Approval Type |
|
Save to create the shell record. You'll now be dropped into, or can open, the step diagram.
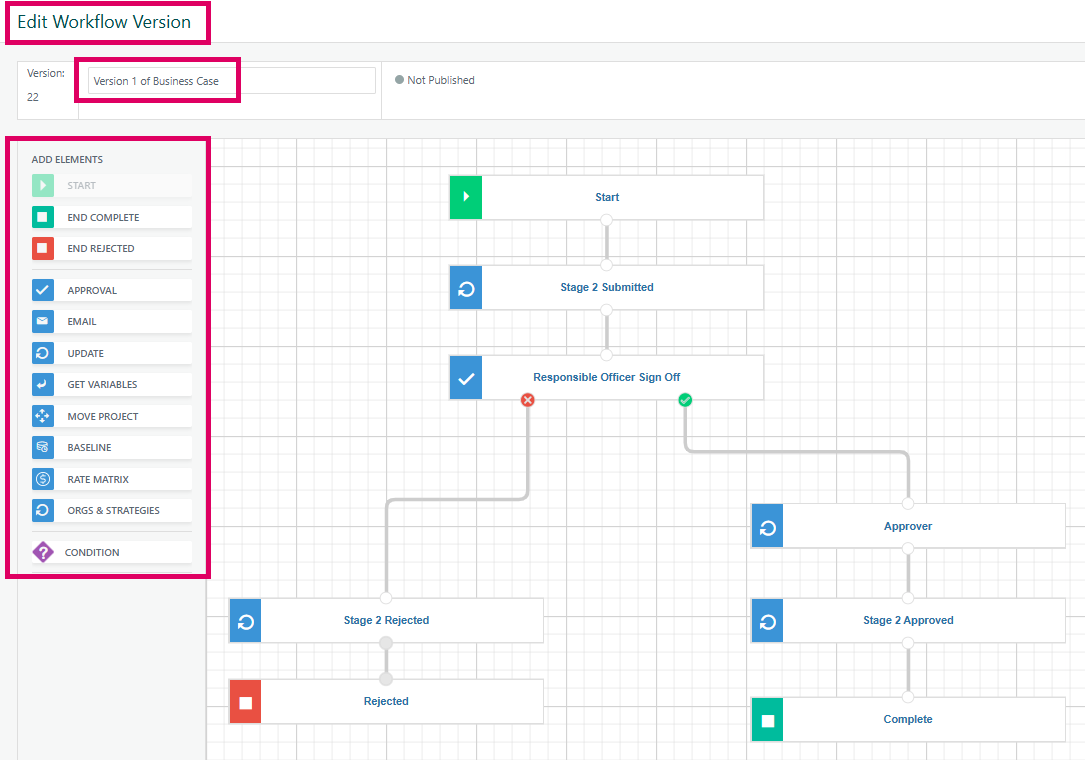
Step 3 — Build the Step Diagram
The diagram is a canvas with a drag-and-drop palette of step types. Every workflow needs a Start and at least one End step; everything else is optional and reusable as many times as the process needs.
Step Type | What It Does | When to Use It |
|---|---|---|
? Start | Entry point — required, exactly one per workflow. | Always the first node. |
? Condition | Branches the path based on a variable's value. | If budget > $X, route to VP; else route to Manager. |
✅ Approval | Routes to one or more approvers and waits for a decision. | Any point a human sign-off is required. |
Update | Assigns or writes a variable on the record. | Set a status field, flag, or calculated value after a decision. |
Sends a notification. | Alert a stakeholder without requiring their approval. | |
Get Variables | Pulls in data the workflow needs to evaluate later steps. | Before a Condition or Approval step that depends on record data. |
Move Project | Relocates a project in the hierarchy. | Portfolio or organisational restructuring steps. |
Baseline | Triggers a baseline action on approval. | Baseline Approval workflows. |
Register Look-Up | Reads a related register record. | Pulling WBS or related register data into the workflow. |
Copy Register Item | Duplicates a register record. | Templating a new item from an approved one. |
Lock Item | Locks a record from further edits. | After final approval, to protect the approved figures. |
? End Complete | Successful exit. | Terminates the path when approval is granted. |
⛔ End Rejected | Unsuccessful exit. | Terminates the path when approval is denied. |
To Build It:
- Drag Start onto the canvas, if not already present.
- Add the steps your process needs, in the order they should occur.
- Draw connectors between steps to define the sequence. A Condition step will have two or more outgoing connectors; label each branch clearly.
- Every path must terminate in either End Complete or End Rejected. Do not leave a dangling branch.
Step 4 — Configure Each Step
Click into each step on the canvas and set its properties:
Step | Configuration Focus |
|---|---|
Approval Steps | Approver, role, or resolving variable; mandatory comments; re-authentication requirements. |
Condition Steps | Variable evaluated and comparison logic for each outgoing branch. |
Update Steps | Variable written and the value or expression that sets it. |
Email Steps | Recipients and message template, including merge variables such as item name, current approver, or item link. |
Get Variables / Register Look-Up Steps | Source data from Smart Form fields, Project variables, Register variables, User attributes, Expense fields, Portfolio, or Financials. |
Step 5 — Set Escalation Rules
Configure what happens when a step goes stale, so nothing depends on someone remembering to check a queue:
- Overdue Approvals Action — Auto-Approve, Auto-Reject, Auto-Cancel, Email, or Reassign.
- Month-End Approvals Action — same set of options, applied specifically at month-end close for workflows tied to financial reporting cycles.
Important: Set escalation rules per Approval step. Different steps in the same workflow can have different escalation behavior.
Step 6 — Assign Workflow Managers
Add the users or role who should have Workflow Manager rights over this workflow once it's live. This includes the ability to Start/Resume, Pause, Restart, or Cancel an instance, and to see the current approver on a stuck item.
Keep this to a small, accountable group, such as a PMO lead or process owner, not everyone who can approve.
Step 7 — Validate
Open the Workflow Errors screen for this workflow and resolve everything flagged before moving on. Common issues include:
- A step with no outgoing connector.
- A Condition with no default branch.
- A required field left unset on a step.
A workflow with unresolved errors can't be activated.
Step 8 — Test as Draft
Leave the workflow's status as Draft and run test records through it if your environment supports a sandbox or test instance. Confirm:
- Approvers receive the item and can Approve or Reject as expected.
- Conditions branch correctly for both true and false test data.
- Emails fire with the right content and recipients.
- Escalation rules behave as expected. This is easiest to verify by temporarily shortening the overdue window in a test environment, then restoring it.
Step 9 — Activate
When testing is clean, set the workflow's status to Active.
Activation note: For types that allow only one active workflow, activating this one will retire whichever workflow was previously active for that type. Confirm that's intended before saving.
- For types that allow only one active workflow, most financial types are affected.
- For types that allow one per template, such as Smart Form, Register, and Project Request, activation only affects new records created against that specific template.
New records matching the type, and template where applicable, will now be routed through this workflow automatically. Records already mid-flight on a prior version or prior workflow are unaffected.
Step 10 — Maintain and Version
Once live, treat edits carefully:
- Editing an Active Workflow Creates a New Version. Instances already running continue on the version they started on; new instances pick up the latest active version.
- Use
Workflow Historyon any instance to check exactly which version it ran against. This is useful when diagnosing why one item behaved differently. - Export/Import as JSON to move a workflow definition between environments, such as test to production, instead of rebuilding it by hand.
- Periodically review
Workflow Listfor old Draft or superseded versions that are no longer needed, and remove what's genuinely unused.
Common Gotchas
Pitfall | How to Avoid It |
|---|---|
Forgetting a Workflow Type Only Allows One Active Instance | Confirm activation impact before saving, not after. |
No Default Branch on a Condition Step | Add a default path so records that do not match explicit conditions still progress. |
Skipping Escalation Rules | Define stale-step behavior so an unavailable approver cannot block the queue indefinitely. |
Activating Without Testing | Test in Draft first to catch Condition logic or Approval routing issues early. |
Too Many Workflow Managers | Limit the role to people accountable for the process, because Workflow Managers can Cancel or Restart live instances. |
Was this article helpful?
That’s Great!
Thank you for your feedback
Sorry! We couldn't be helpful
Thank you for your feedback
Feedback sent
We appreciate your effort and will try to fix the article