Custom Formulas for Smart Forms
Purpose
This guide explains how to build custom formulas in Smart Forms — to control field and group visibility, calculate values, display formatted text, and derive statuses such as RAG (Red/Amber/Green) ratings. It's written for anyone configuring Smart Forms who is comfortable navigating Cora but new to writing formulas.
1. Visibility and Change Formulas
Visibility and change formulas control whether a field or group appears on a Smart Form, and whether a user can edit it. They're most commonly driven by three things:
- Project Type
- Project Stage
- User (e.g. role or permission attribute)
You can apply these formulas at either the Group level or the Field level.
Examples
Driven By | Example 1 | Example 2 |
|---|---|---|
Project Type |
|
|
Project Stage |
|
|
Users |
|
|
Finding Field and Variable IDs
- Navigate to Pages > Groups > Field, and add a new field.
- Select Based on formula, then click the fx button to open the formula builder.
Use Show Details for group to filter down to the fields you need.
- Anything shown inside
< >is a system field. - Everything listed after that is a Smart Form group.
- Anything shown inside
- Click Project Variables to see a full list of available project variables.
- Hover over the blue Type text next to any field to see the values it accepts.
2. Text Function Fields
Text Function fields let you display static or styled text on a Smart Form — for example, instructional copy or a status explanation.
To add text:
- Create a Text Function field.
- In the formula box, write your text wrapped in single quotes:
'Your text here'
Line breaks: for longer text, insert <br> where you want the text to wrap, so it doesn't run off the edge of the page.
Example:
'This status should be selected when the project is handed over from Pre-Construction. <br>The project is through the Final Investment Decision and/or Financial Close, and construction has commenced.'
Styled text: you can also use inline HTML/CSS for callouts or highlighted instructions, for example:
'<table style="width: 100%; table-layout: fixed">
  <tr style="font-size:1.4em; text-align:center;">
    <td style="word-break: break-word; white-space: pre-wrap; color: #ff0000;">
      Please ensure a Baseline is set following Approval
    </td>
  </tr>
</table>'
3. Referencing Other Fields in Calculations
You can reference one field's value from within another field's formula.
Basic reference:
- Field A is a numeric field.
- Field B is a Numeric Function field.
- In Field B's
fx, enter Field A's ID.
Combining multiple fields:
You can calculate across several numeric or Numeric Function fields by combining their IDs in one formula, e.g.:
ID123+ID124
Referencing a multi-select dropdown:
Standard field references don't work for multi-select dropdown values — you need a Text Function field instead.
- Create your Dropdown List field and confirm it's set to multi-select.
- Create a Text Function field.
- In the formula, write:
Parent(ID123).Description— this returns a text string containing the selected dropdown values.
4. Days Between Two Dates
To calculate the number of days between two date fields:
- Create two Date fields (e.g.
ID111andID222) and note their IDs. - Create two Date Function fields that reference each date field (e.g.
ID333referencingID111, andID444referencingID222). Create two Numeric Function for Dates fields, referencing the Date Function fields with an
Nappended to the ID:ID333N ID444N
This converts each date into a number (total days since 1 January 1900).
Create a final Numeric Function field to subtract one from the other:
ID666-ID555
5. Dividing Two Values
To divide one field's value by another while avoiding a divide-by-zero error:
IIF(ID1791 = 0, 0, ID1791/ID1656)
This returns 0 if ID1791 is zero; otherwise it returns ID1791 divided by ID1656.
6. Creating a Calculated RAG Status
You can derive a RAG (Red/Amber/Green) status — or a priority/tier field — from other fields on the form using a Dropdown List Function field.
Step 1: Identify your source dropdown
- Create a Dropdown List Function field and select the dropdown list you want to reference — in this example, RAG.
Note the ID value assigned to each option. In this example:
- Red =
1 - Amber =
2 - Green =
3
- Red =
Step 2: Convert each contributing RAG into a numeric score
Create a Numeric Function field for each contributing dropdown (e.g. Time, Cost, Scope), converting its RAG value into a score. For example, if ID123 is the "Cost" RAG field:
Iif(ID123=1, 1, Iif(ID123=2, 3, Iif(ID123=3, 5, 0)))
- Red → score of
1 - Amber → score of
3 - Green → score of
5 - No value → score of
0
Step 3: Combine the individual scores
It's good practice to roll multiple contributing RAG scores into a single Numeric Function field. For example, combining a Cost score (ID123) and a Scope score (ID124):
Iif(ID123=1, 1, Iif(ID123=2, 3, Iif(ID123=3, 5, 0)))
+ Iif(ID124=1, 1, Iif(ID124=2, 3, Iif(ID124=3, 5, 0)))
Step 4: Use the combined score to drive the overall RAG
Iif(ID789<5, 1,
Iif(ID789>4 and ID789<20, 2,
Iif(ID789>20, 3, 4)))
- Score under 5 → Red
- Score between 5 and 19 → Amber
- Score over 20 → Green
- (A fourth outcome,
4, is included as a fallback — confirm what this should represent, e.g. "no data available," before publishing.)
7. Registers
See the Register knowledge articles for formulas on registers.
8. Further Topics
The following are reference screens available within CoraPPM
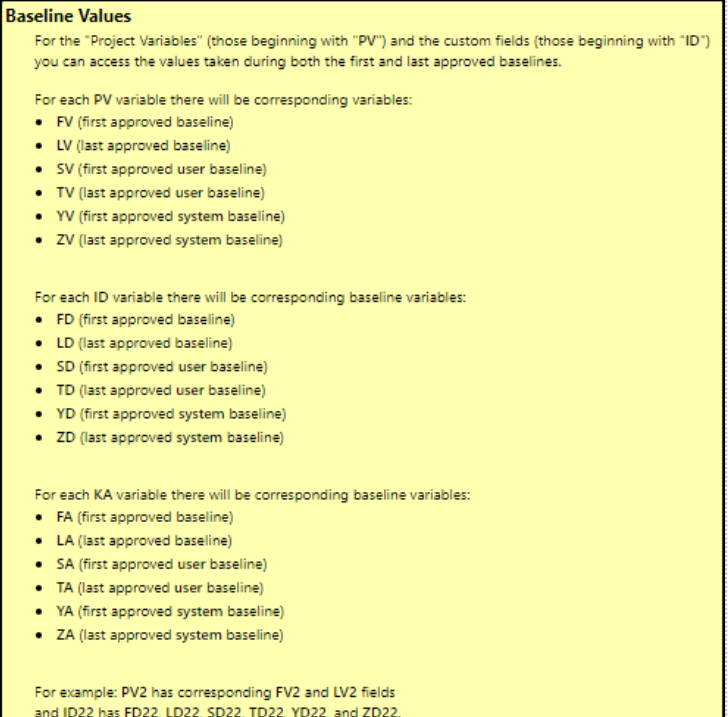
Baseline Values
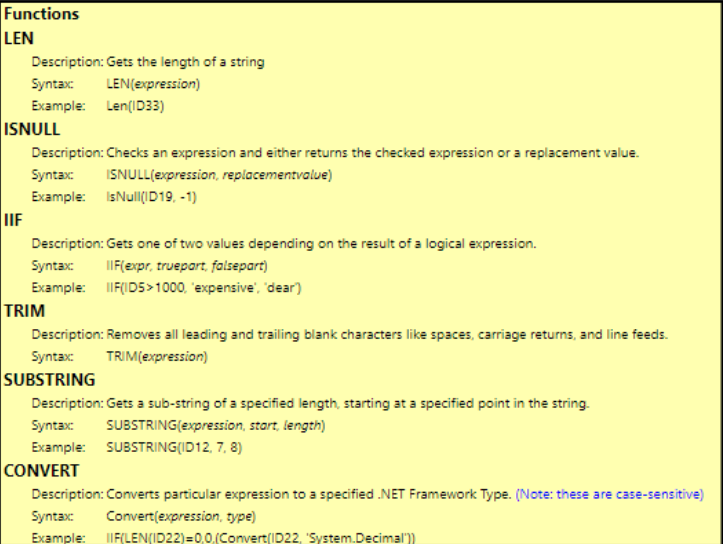
Functions
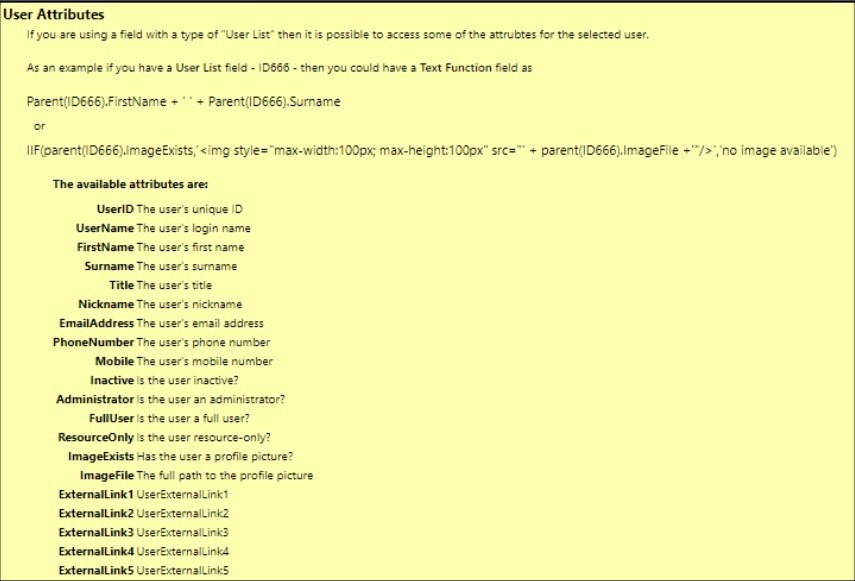
User Attributes
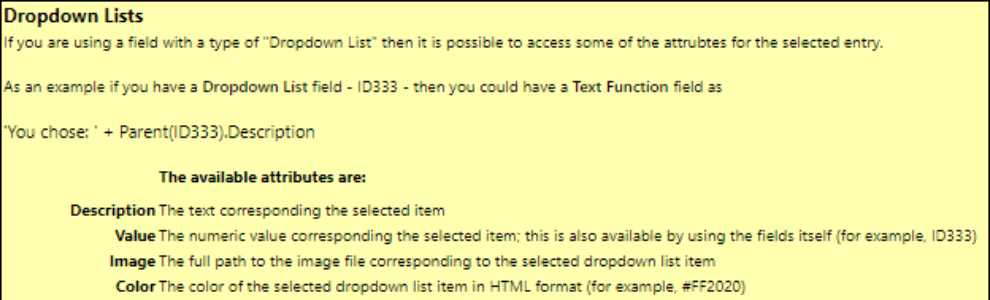
Dropdown Lists
Was this article helpful?
That’s Great!
Thank you for your feedback
Sorry! We couldn't be helpful
Thank you for your feedback
Feedback sent
We appreciate your effort and will try to fix the article