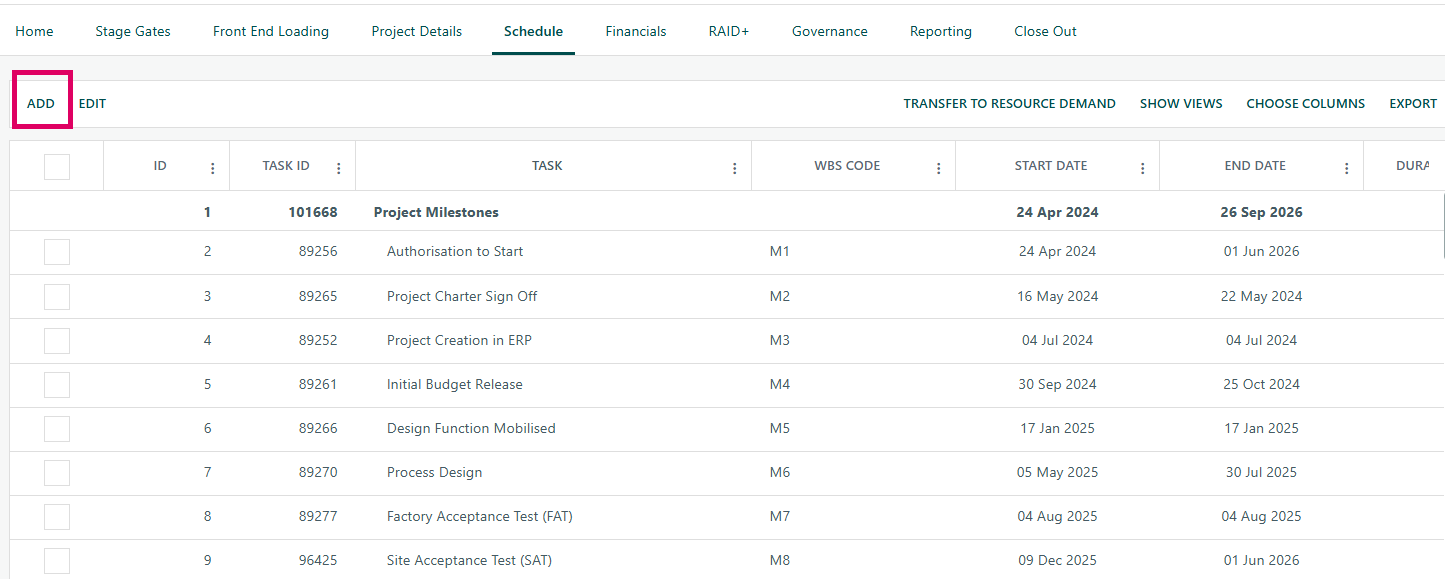
The Task Update page in Cora PPM is the primary tool for project team members to view and edit the full schedule of tasks for a project, all within a single interactive flat-list grid. It is accessed from the Schedule tab of a Project record (and can also appear in the project navigation toolbar as "Task Updates").
What it does:
The Task Update page loads all tasks belonging to the current project and presents them in a scrollable, paginated grid. Users can inline-edit many task fields directly in the grid — no separate form or popup is required for most changes. Parent/summary tasks are shown in bold; task hierarchy is represented by indentation in the task name column. Inactive tasks are displayed with strikethrough formatting.
What can be edited:
- Task Name — the text description of the task
- WBS Code — must be unique across all tasks in the project
- Start Date and Finish Date — changing one automatically recalculates the other and the duration in real time (via an AJAX web service call)
- Duration — entered as a number with an optional suffix:
Dfor days,Hfor hours,Mfor minutes, andEto denote elapsed time (e.g.5D,3.5H,10ED) - % Complete — entered as a decimal between 0 and 100; automatically adjusts the task's status (Not Started → In Progress → Complete)
- Status — a colour-coded dropdown (configurable list); changing status to "Complete" (2) sets % Complete to 100, and vice versa
- Notes — free-text, multi-line
- Milestone Deliverable — a dropdown to classify the task as a milestone type; unlocks Milestone Detail, At Risk, and Key Milestone fields
- Milestone Detail — free text description of the milestone
- At Risk / Key Milestone — yes/no flags, shown as tick/cross icons
- Skills (optional feature) — opens a modal to assign required skill categories to the task
- Planned Resources (optional feature) — opens a modal to assign planned resource users
- Account Codes at Task Level (optional feature) — opens a modal to assign finance account codes to the task
- Task Calendar (optional feature) — assigns a project-specific working calendar to this task
- Task Type (optional feature) — classifies the task (e.g. Milestone) from a configured type list; Milestone-type tasks cannot have a non-zero duration unless the system is configured to allow it
- Hide In Timesheets — flags a task as invisible to timesheeters
- Work Order (optional feature) — links the task to an external work order
- No Resource Required (optional feature) — marks the task as intentionally unresourced; clearing planned resources on confirm
- EV% Complete / EVM Technique (optional feature) — earned value tracking fields
- Custom task fields — any additional date, number, dropdown, or text fields configured by the system administrator
Access control: Only users with the Tasks Full Rights / WBS / Gantt / Network Diagram project security right can see and use the page. Users without this right see an access-denied label instead.
After saving: When a save is triggered, the system determines whether project rescheduling is needed:
- No reschedule — only % Complete, notes, or non-date fields changed; the scheduler applies percentage-complete roll-ups only
- Full rescheduling — dates or duration changed; the task scheduler re-arranges all successor tasks using predecessor/successor links and constraints
- Out-of-Sequence — if a task's progress or dates conflict with its predecessor chain (i.e. a task is being updated before its predecessor is finished), a "Planning Wizard" modal appears, asking the user to choose how to handle the sequence conflict before saving proceeds
- Constraint notifications (Statusing variant) — if the user manually changes a start or finish date that would impose a new scheduling constraint, a confirmation toast is shown before the save is committed
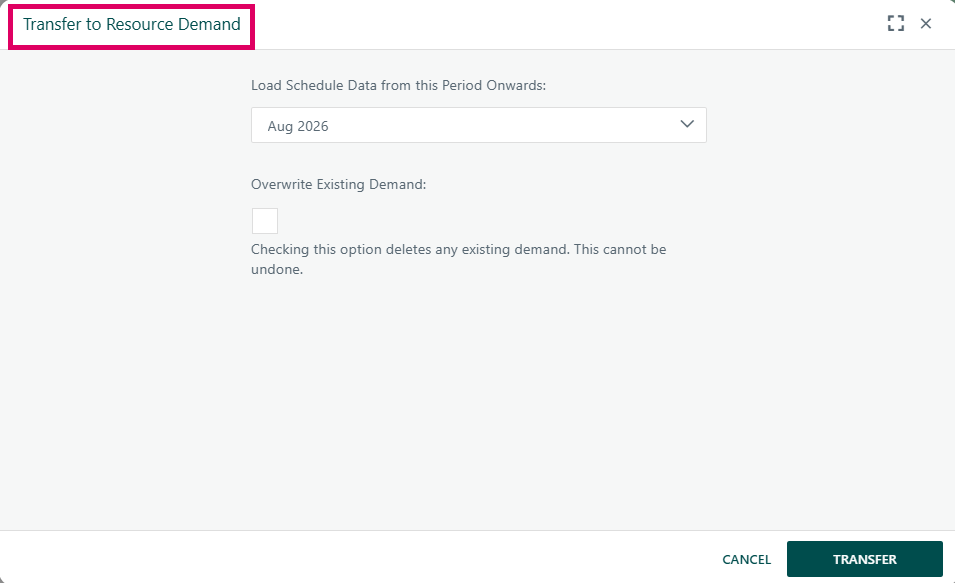
The "Transfer to Resource Demand" dialog is a focused, two-field modal popup that acts as the bridge between a project's task schedule (the Gantt chart, WBS, or the legacy Project Skills Request page) and the Resource Demand module in Cora PPM. Its purpose is to read the skill effort that has been distributed across all active tasks in the project schedule and write those calculated FTE demands into the Resource Demand grid, period by period.
What it does in plain English:
When a project manager or resource manager has built a schedule where tasks carry assigned skills (and optionally named resources), each task has a workload spread across calendar periods — either by an S-curve distribution profile or by a manually entered custom distribution. The "Transfer to Resource Demand" feature takes that spread and converts it into the forward-looking demand record that supply managers and resource managers use to plan and allocate people. Without this step, the schedule and the resource demand plan live in separate silos.
The two controls on the dialog do distinct things:
- "Load Schedule Data from this Period Onwards" dropdown — Defaults to the current calendar period (or the nearest available period within the project date range). Selecting a later period (e.g., Aug 2026) means that only schedule-derived demand from that period forward is written to the Resource Demand grid. Earlier periods already recorded in the demand grid are left completely untouched, regardless of what the schedule says. This protects historical demand data that may already have approved allocations attached to it. The dropdown is populated with periods from the project's planned start to its planned finish, using the appropriate fiscal or standard calendar, or weekly periods if the project is configured to track demand in weeks.
- "Overwrite Existing Demand" checkbox (default: unchecked) — When left unchecked, the transfer is additive and protective: it merges new schedule-derived demand into the existing demand records but does not remove any demand entry that already exists beyond the selected period. When checked, the system first deletes all existing demand for the specified period range and then writes the newly calculated values — making the transfer destructive and irreversible. The inline warning "Checking this option deletes any existing demand. This cannot be undone." is shown directly below the checkbox to make this risk explicit before any action is taken.
What happens on TRANSFER:
The system iterates in parallel over every active task in the project that carries at least one skill requirement. For each task-skill combination, it reads the effort distribution (either from an S-curve model or from a custom period-by-period manual distribution) and converts the hours into FTE values per period, accounting for the number of working days in each period per the project's calendar (including company holidays and project-specific non-working days). All skill demands for the same skill and period across multiple tasks are summed. The resulting skill-period demand records are then either merged into or replace the existing Resource Demand entries. A history comment is recorded, and relevant resource managers or supply managers linked to those skills are notified by email.
If the system-level "Bypass Resource Demand Approvals" setting is active, additional behaviour is triggered: the period-selection dropdown is locked to the first period and forced to overwrite mode, and any previously sub-allocated users are also automatically re-distributed across periods to match the updated schedule, requiring no approval workflow.
The dialog can be opened from three distinct locations in Cora PPM: the Gantt toolbar, the WBS toolbar, and the Resource Demand page's action menu ("Load From Schedule"). All three routes open the same ProjectForecastingSCM.aspx modal.
Where you find Transfer to Resource Demand
The "Transfer to Resource Demand" dialog can be opened a number of locations, the most common are:
- Gantt Chart Toolbar
- Navigate to a project and open the Gantt view.
- In the toolbar, look for the "Transfer to Resource Demand" button (labelled dynamically based on your system's Resource Demand feature name, e.g., "Transfer to Resource Demand").
- This button is only visible and enabled if the Project Skills Planning feature is enabled and you hold the role of Project Owner, Portfolio Manager, or Resource Manager for that project. If you do not have access, the button appears greyed out with a tooltip explaining the restriction.
- WBS (Work Breakdown Structure) Toolbar
- Navigate to a project and open the WBS view.
- The same toolbar button described above is also present here under the same access rules.
- Resource Demand Page — Action Menu
- Navigate to a project's Resource Demand page (under the Capacity section).
- Click the three-dot/kebab menu icon in the top-right of the page header.
- Select "Load From Schedule" from the dropdown menu. (In this context the primary button caption reads "Load" instead of "Transfer".)
Was this article helpful?
That’s Great!
Thank you for your feedback
Sorry! We couldn't be helpful
Thank you for your feedback
Feedback sent
We appreciate your effort and will try to fix the article