The Resource Allocation page in Cora PPM — formally named Resource Demand — is the primary interface for managing skill-based resource planning at the project level. It bridges the gap between how much effort a project needs (demand) and how much effort has been committed by named resources (allocation), displayed side by side in a scrollable time-phased grid.
Note: Use this page to compare demand, allocation, and gaps by skill and period, then move approved resources into scheduled project work.
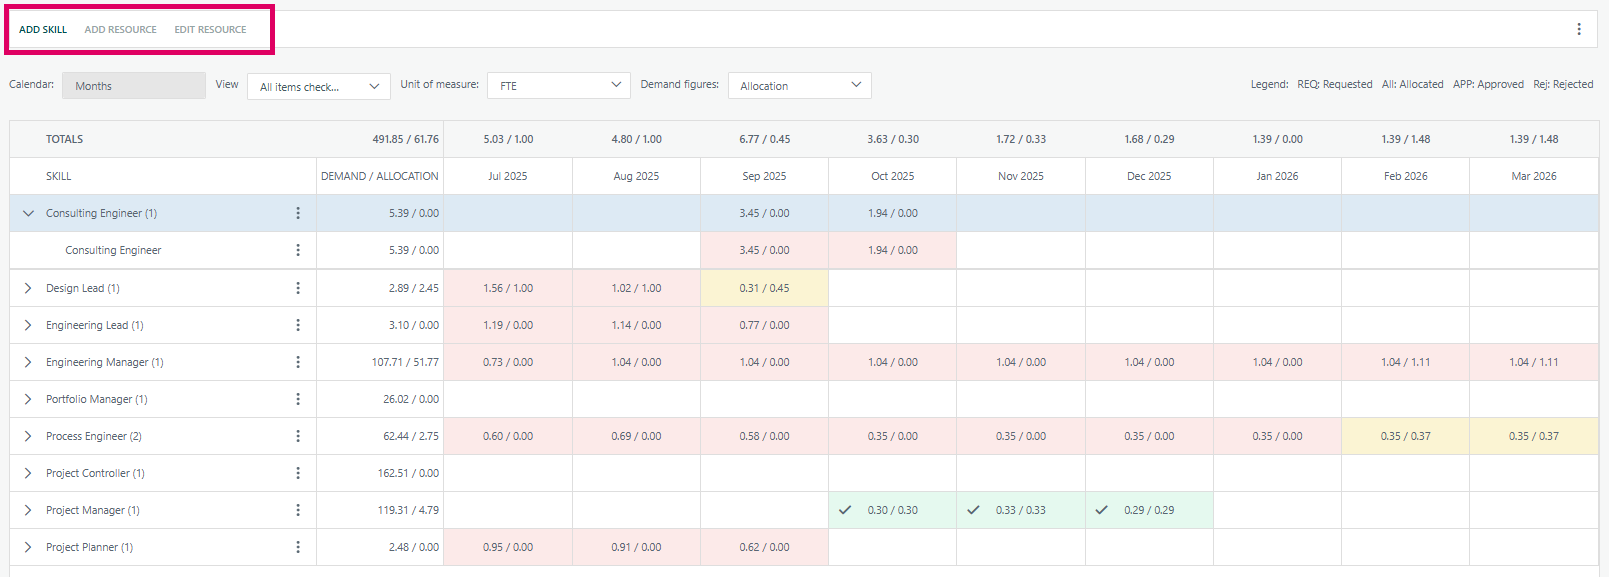
What It Shows
The page answers one fundamental question for a project manager: "For each skill required on my project, how much have I requested and how much is confirmed?"
Every row in the grid represents a skill (e.g., Engineering Manager, Project Manager). Within each skill, the system tracks one or more sub-skills (toggle must be enabled for Sub-skills) — finer-grained demand lines that can carry custom attributes such as cost center or grade. Expanding a skill row reveals its sub-skills, and expanding a sub-skill reveals the individual named resources (users or teams) allocated against it.
Each cell in the time-phased columns shows two figures: Demand / Allocation (or optionally Demand / Gap). Demand is how many FTEs, days, or hours the project needs for that skill in that period. Allocation is the sum of approved and pending resource commitments against that skill in that period.
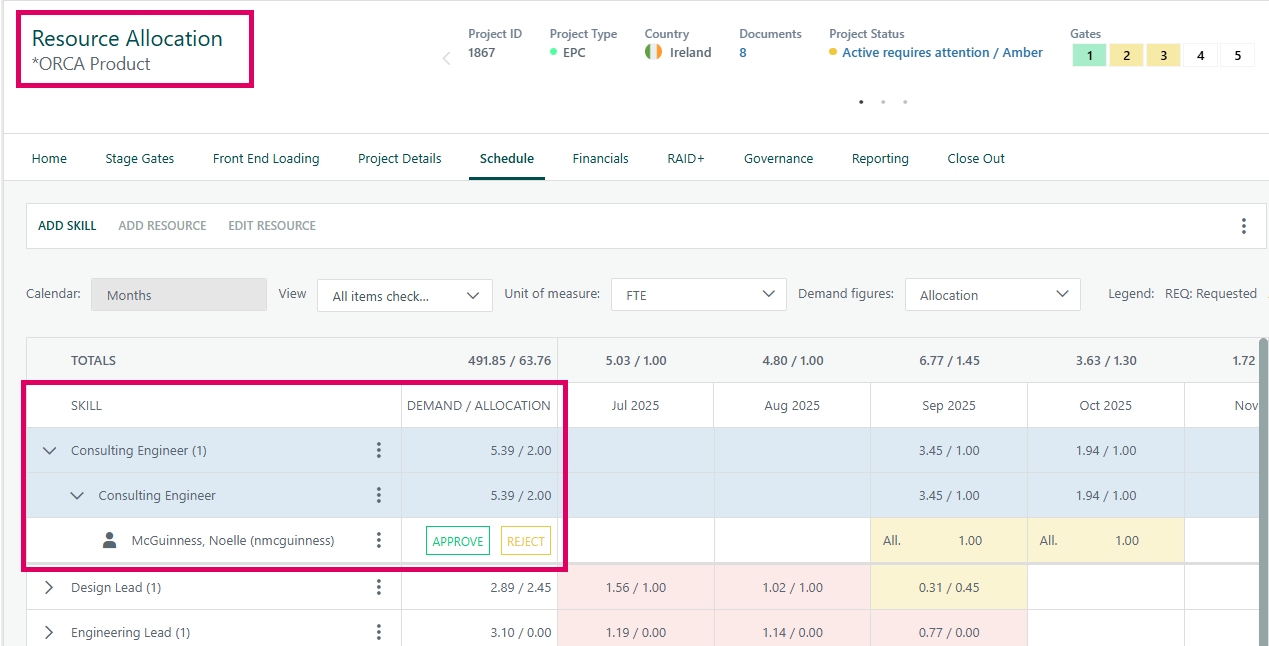
Cell Color Coding
Cell Color | Meaning |
|---|---|
Green with a checkmark (✓) | Demand is exactly met by approved allocation; the gap is zero within the configured threshold. |
Yellow | A gap exists but falls within a configurable deviation threshold; demand is close to being met. |
Pink/Red | Demand is not met and the gap exceeds the threshold; action is needed. |
For individual resource (user/team) rows, the color reflects approval status:
- Gray — allocation is Approved (APP).
- Yellow — allocation is Requested / Pending (REQ/All — awaiting approval).
- Red — allocation has been Rejected (Rej).
The Approval Workflow
When a resource manager allocates a named resource to a skill sub-period, that allocation enters a Requested state. Depending on the system's Resource Model (Organization or Group), a designated Demand Approver or Resource Manager must review the request and either Approve or Reject it. Only approved allocations count as firm commitments. The VIEW RESOURCE REQUESTS button surfaces all pending approvals in one click and auto-expands the relevant rows. Email notifications are sent automatically on allocation and on every approval or rejection.
Demand Figures: Allocation vs. Gap Mode
The Demand figures dropdown switches between two display modes:
- Allocation (default) — the second column shows total allocated effort (approved + pending).
- Gap — the second column shows the shortfall between demand and approved allocations, making it easier to spot where resources are still needed.
Units of Measure
The entire grid can be toggled between FTE (full-time equivalent), Days, and Hours using the Unit of Measure dropdown. All internal calculations store FTE with high precision; day and hour values are derived using the configured FTE hours per day. The display unit can differ from the project's native unit, but editing or adding is restricted to the project's own unit.
Calendar Period
The Calendar dropdown selects whether columns represent Months or Weeks. Monthly is the default; weekly is available if the project is configured for it. The TOTALS row always shows the cross-period sum of demand and allocation across all visible skills.
Key Actions
Button / Menu Item | Who Can Use It | What It Does |
|---|---|---|
ADD SKILL | Project Owner | Opens a modal to choose a skill, optionally add custom attributes, and enter demand quantities period by period. |
ADD RESOURCE | Demand Manager / Resource Manager | Opens a modal to select an available resource and allocate them to a specific skill-sub-period combination. |
EDIT RESOURCE | Demand Manager / Resource Manager | Opens the same modal in edit mode, pre-filled for the selected periods. |
VIEW RESOURCE REQUESTS | Demand Approver / Supply Manager | Jumps to and expands all rows with pending allocations awaiting approval. |
Load From Schedule | Project Owner | Imports skill demand from the project's Gantt schedule using S-curve distribution. |
Allocate to Tasks | Project Owner (when approved resources exist) | Opens a modal to assign approved resources to specific schedule tasks. |
Export to Excel | All users with access | Downloads the current grid as an Excel file. |
Export as Image | All users with access | Downloads the current grid as a PNG image. |
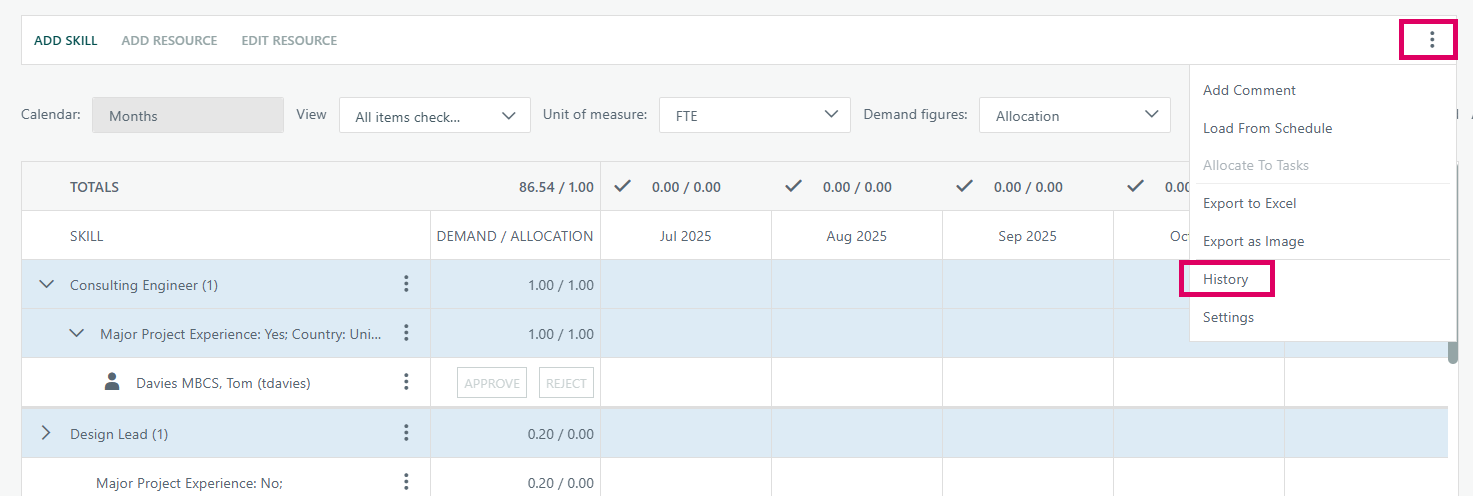
History | All users with access | Shows an audit trail of all changes, approvals, and comments. |
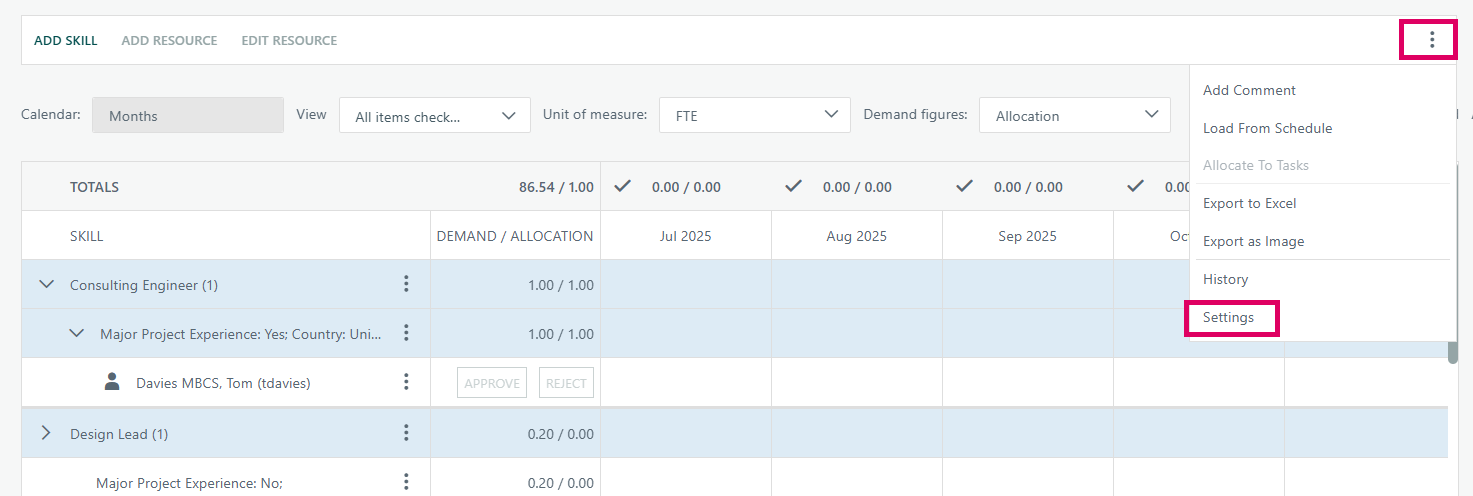
Settings | Project Owner | Configures the planning date range, constraint options, deviation threshold, and resourcing strategy. |
Why Customers Use It
- Turn a skill need into a named, approved resource without side-channel emails or spreadsheets tracking who has been requested.
- Give managers a single approval queue instead of ad hoc requests landing in inboxes and chat threads.
- See demand versus proposed allocation — or the gap — at a glance, color-coded per skill and period.
- Keep three states distinct and auditable: who has been proposed, who has been approved, and who has actually been scheduled onto a task, rather than one unclear "assigned" status.
- Keep a full history of every approval and rejection decision on the project.
- Auto-fit approved resourcing onto the right tasks instead of mapping each one by hand.
Common Use Cases by Project Environment
? Manufacture-to-Order
- Lock down named capacity before committing a ship date — propose a specific engineer against a confirmed order's design demand and get it approved before the date is promised.
- Prevent double-booking a specialist — route every new order's resourcing proposal through one approval queue, so a resource manager sees the full picture before signing off, not just one order at a time.
- Skip manual task mapping — once approved, use Allocate to Tasks / Auto Allocate to fit that engineer's time onto the order's actual production tasks automatically.
? Pharma
- Get sign-off before the filing clock starts — propose a named Regulatory Affairs resource against a submission's skill demand and route it to a Demand Approver.
- Record why a request was declined — over capacity, wrong certification, or another reason — as a comment on the line, not a side email that will not be found later.
- Pull the approval trail for an inspection or audit straight from History, rather than reconstructing it from memory.
?️ Capital / EPC Projects
- Break demand down before naming names — split a capital project's Engineering, Process, and Design Lead needs into monthly skill lines before proposing specific resources against each.
- See exactly which months are still uncovered — switch Demand figures to Gap ahead of a phase-gate review.
- Move straight from approval to schedule — allocate approved engineers directly onto the detailed-design tasks that need them.
?️ GovCon
- Match labor categories to credentialed people — propose named, cleared resources against a contract's skill demand and route them through a defined approver, not an inbox.
- Keep proposing and approving as separate duties — Demand Manager and Demand Approver are distinct roles here, which maps naturally onto contract compliance requirements around separation of duties.
- Produce a staffing record on demand — export the grid to Excel for a contract funding or staffing review.
Resource Allocation in Cora PPM is a multi-layered capacity management feature that connects project resource demand (what skills are needed and when) to specific people or teams being assigned to fulfill that demand. It spans the entire lifecycle of workforce planning for a project: defining what types of resource are needed, quantifying that need period by period, identifying and assigning individuals or teams, managing an approval workflow, and providing visibility through dashboards and a REST API.
What it does, from a user's perspective:
- Skill Demand Planning. A project's designated team (Project Owner, Resource Manager, or Demand Manager) specifies, for each required skill, how many FTEs, days, or hours are needed across each monthly or weekly period of the project. This produces a demand profile per skill, sometimes broken down further into sub-skills with custom attributes (e.g., cost center, grade, location).
- Resource Allocation (assigning people to demand). Once demand is declared, a Resource Manager or Demand Manager selects individual users — or teams — to fill those slots. Allocation values are entered period by period and are stored in FTE, days, and hours simultaneously. A capping mechanism prevents a single user from being allocated above a configured FTE cap (default: 1.0 FTE) for any period.
- Approval Workflow. In the Organization resource model, each allocated user has a Demand Approver and potentially a Demand Supply Manager. When a resource is added, an email notification is sent to the appropriate approver. The approver then explicitly approves or rejects each allocation. In the Group model, the resource's Resource Manager performs this step. Approval status (approved / rejected / pending) is color-coded on screen.
Two distinct UI surfaces exist for managing demand and allocation:
- ProjectSkillsRequestPage — the legacy "classic" grid used for standard monthly demand. Renders skills as rows, periods as columns, supports inline editing, drag-and-drop reallocation, approve/reject icons, and Excel export.
- ResourceDemand page — a newer, refactored version supporting both monthly and weekly periods. Uses a dynamically built div-based grid and modal dialogs for CRUD operations.
- My Resource Allocation dashboard widget — a personal dashboard widget showing the current user's own allocations across all their projects, with a summary counter and a detail grid. From this widget, a manager can also fix project access issues for users who are allocated but have no project rights.
- Skill Resource Allocation popup — a targeted popup for allocating a specific user to a specific task or project for a specific skill, expressed as hours, days, or a percentage. Used from the Skills requirement report.
- REST API — a WebApi controller exposes the
GET ResourceAllocationProfileendpointsfor integration and reporting. This requires admin-level authentication and support pagination, optional project/period filters, and field shaping. - Flexible measurement units. Allocation can be viewed and, in some screens, edited in FTE, Days, or Hours. All three representations are stored simultaneously so switching the display unit does not require re-entry. Fiscal calendar support means nonstandard period numbering is handled correctly throughout.
- Gap and threshold reporting. Every skill row shows "Demand / Allocation" or "Demand / Gap" (user-selectable). A configurable demand deviation threshold, set per project or globally, determines whether a gap is shown as acceptable (green) or as a genuine shortfall (red).
- History logging. Every resource add, edit, approve, reject, or delete action is written to the capacity management history, with the period and FTE value included in the comment text.
Key difference from Insights and Scenario Planning: Portfolio/Resource Insights are read-only analysis screens, and Scenario Planning is a disposable what-if sandbox. Resource Allocation is the live, working screen — this is where a real resourcing decision for a real project actually gets proposed, approved, and scheduled.
Acronyms & Terms Used on This Screen
Term | Stands For | What It Means Here |
|---|---|---|
FTE | Full-Time Equivalent | One of the available units of measure — one FTE is one person working full-time for the period shown. |
REQ | Requested | A proposed resource assignment awaiting a decision. Shown in the on-screen legend. |
All | Allocated | The total currently proposed for a skill/period, whether or not it has been approved yet. This is a different sense of "allocate" from Allocate to Tasks below — see the FAQ. |
APP | Approved | A proposal that has been signed off by a manager/approver. |
Rej | Rejected | A proposal that has been turned down. |
Demand | — | How much of a skill the project needs for a given period. The first number in each |
Allocation | — | The proposed or approved amount against that demand. The second number in each cell — swap it for Gap via the Demand figures dropdown. |
Gap | — | Demand minus current Allocation — viewable directly by switching Demand figures to Gap. |
Skill / Sub-skill | — | The demand-line grouping. A skill (e.g., Design Lead) can be expanded to show the named resources proposed under it. |
Demand Manager / Demand Approver / Demand Supply Approver | — | Roles that can propose or approve resourcing under the Organization resource model. |
Resource Manager | — | The equivalent approving role under the Group resource model. |
Auto Allocate | — | A button inside Allocate to Tasks that automatically distributes an approved resource's effort across matching tasks. |
Demand Deviation Threshold | — | A tolerance set in Settings by the project owner, controlling how far actual resourcing can drift from planned demand before it is flagged. |
Step-by-Step: Using the Resource Allocation Screen
Each task below is self-contained — jump to the one you need. They are ordered in the sequence you typically work through: read the grid, set up your view, then create, approve, and allocate.
1. Read the Grid
- The TOTALS row at the top sums Demand/Allocation across every skill for each period column.
- Each Skill row shows the skill name, the number of resources proposed against it in parentheses (e.g., Design Lead (1)), and a
DEMAND / ALLOCATIONfigure per period. - Click the arrow next to a skill to expand it and see the individual resources proposed underneath.
- Read cell shading as a quick health check: a fuller match between demand and allocation reads green, a partial match reads yellow, and a larger shortfall reads red/pink.
Check the Legend in the top-right of the filter bar —
REQ: Requested,All: Allocated,APP: Approved,Rej: Rejected— to interpret individual resource rows.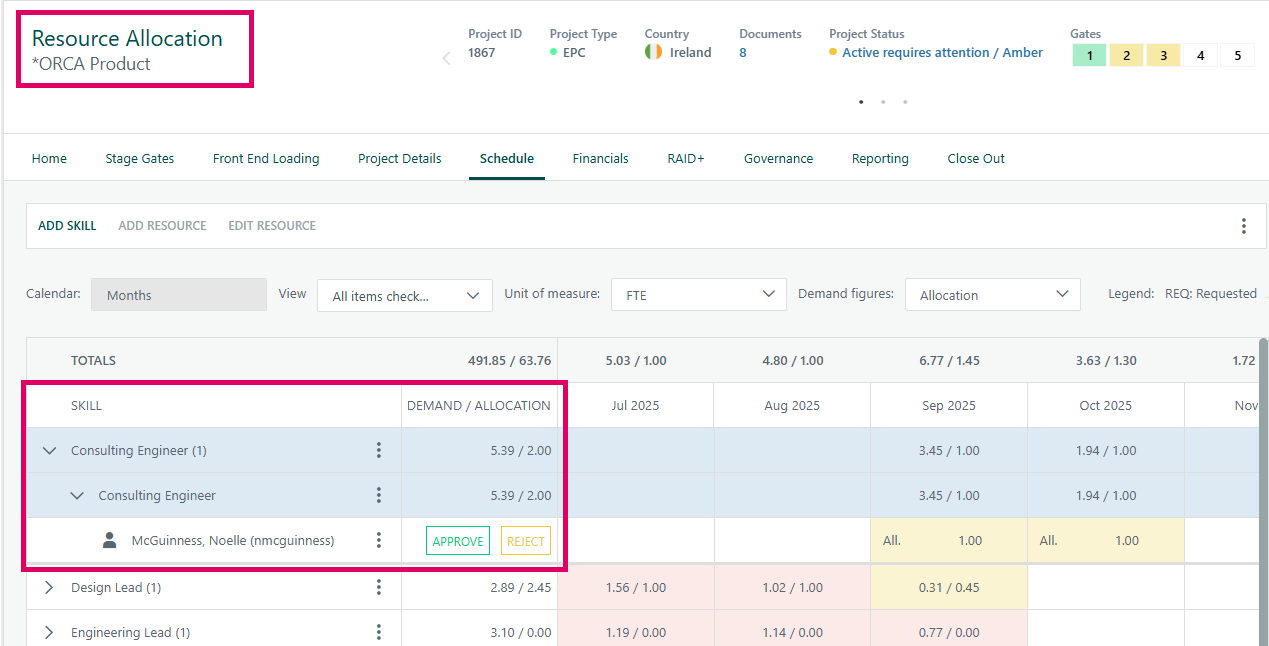
2. Set Up Your View
- Calendar — switch between Months and Weeks to change the period columns' granularity.
- View — check or uncheck Demand Met and Demand Not Met to show only skills that are fully covered, only ones that are not, or both.
- Unit of Measure — choose FTE, Days, or Hours to change how every figure on the grid is expressed.
Demand Figures — choose Allocation to see what has been proposed/approved, or Gap to see the shortfall directly.

3. Add a New Skill Demand Line
- Click ADD SKILL.
- Use the Skill Demand dropdown to search and select the skill/discipline needed.
- Enter demand for each period either by typing directly into each period's field, or by entering a single figure under Monthly Demand and clicking Apply to bulk-fill every period, then adjusting individual periods as needed.
- If your organization has custom attributes configured, add any that apply under Skill & Attributes.
Click Add to save the new demand line.

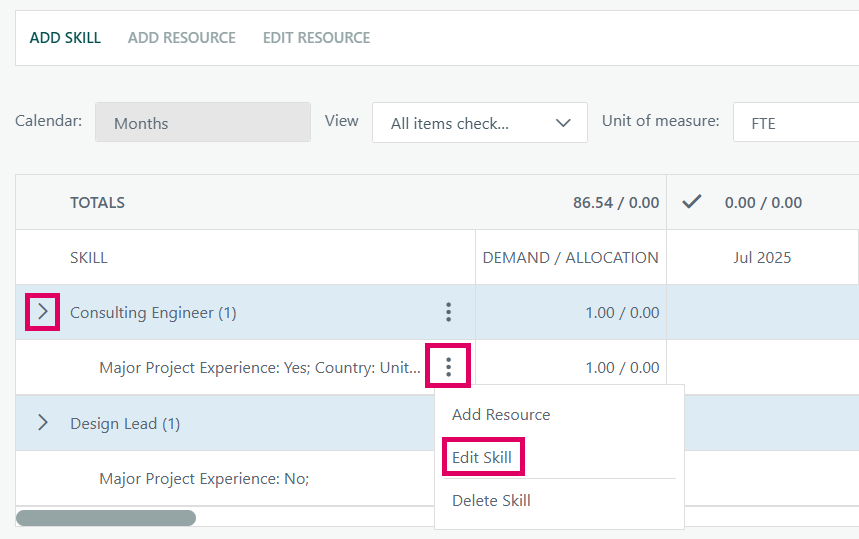
4. Edit an Existing Skill Demand Line
- Open the ⋮ menu on the skill's row and choose Edit Skill.
- Adjust the per-period demand figures. The skill itself cannot be changed once the line exists — only the demand values.
Click Update to save.
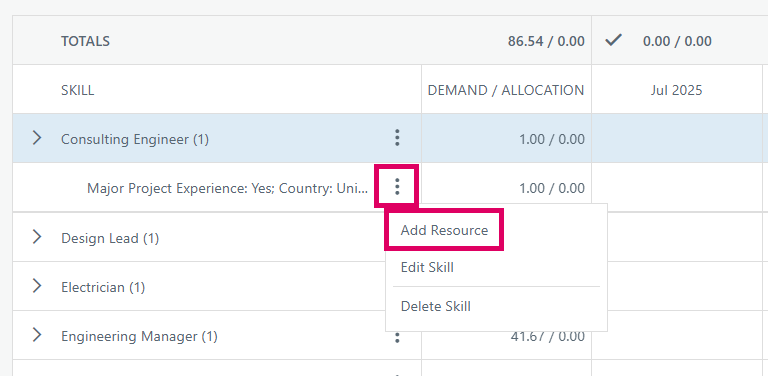
5. Propose a Resource Against a Skill
- Select the skill or sub-skill row you want to resource.
- Click ADD RESOURCE — this stays grayed out until a skill row is selected.
- On the Resource Details tab, optionally narrow the resource pool by Skills, Organization, Resourcing Department, or a custom attribute filter.
- Switch to the Availability tab and check the box next to the user or team you want to propose.
- Enter % of Demand to allocate for the relevant periods using the period scroller.
- If needed, check Cap user at FTE and set a ceiling so this resource is not over-committed by the request.
Click Save to add the proposal — it appears as a Requested (REQ) line awaiting approval.
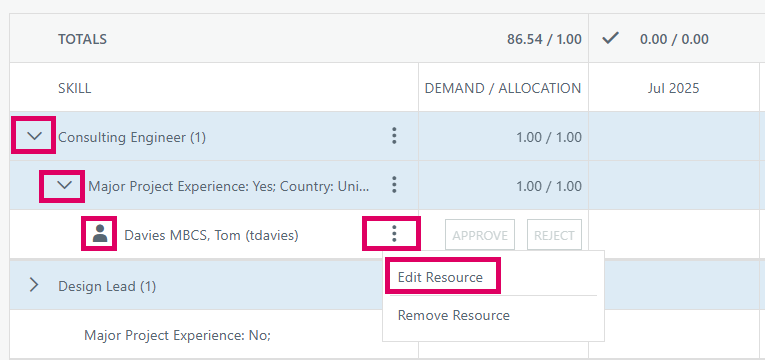
6. Edit a Proposed Resource Assignment
- Select the resource's row.
- Click EDIT RESOURCE — this stays grayed out until a resource row is selected.
- Adjust the % of Demand to allocate per period, or the FTE cap.
Click Save.
7. Approve or Reject a Resource Request
- On a pending (REQ) cell, click the inline Approve or Reject link.
- Confirm in the dialog that appears ("Are you sure you want to approve/reject this allocation?").
- The cell updates to APP or Rej, and the decision is logged automatically.
You can only approve or reject requests that are yours to decide on — the links only appear for pending requests where you are the approver.
8. See Everything Waiting on Your Approval
- Click VIEW RESOURCE REQUESTS — when you have pending approvals, the button shows a count, e.g., VIEW RESOURCE REQUESTS (3).
- Work through the filtered list, approving or rejecting each one as in Step 7.
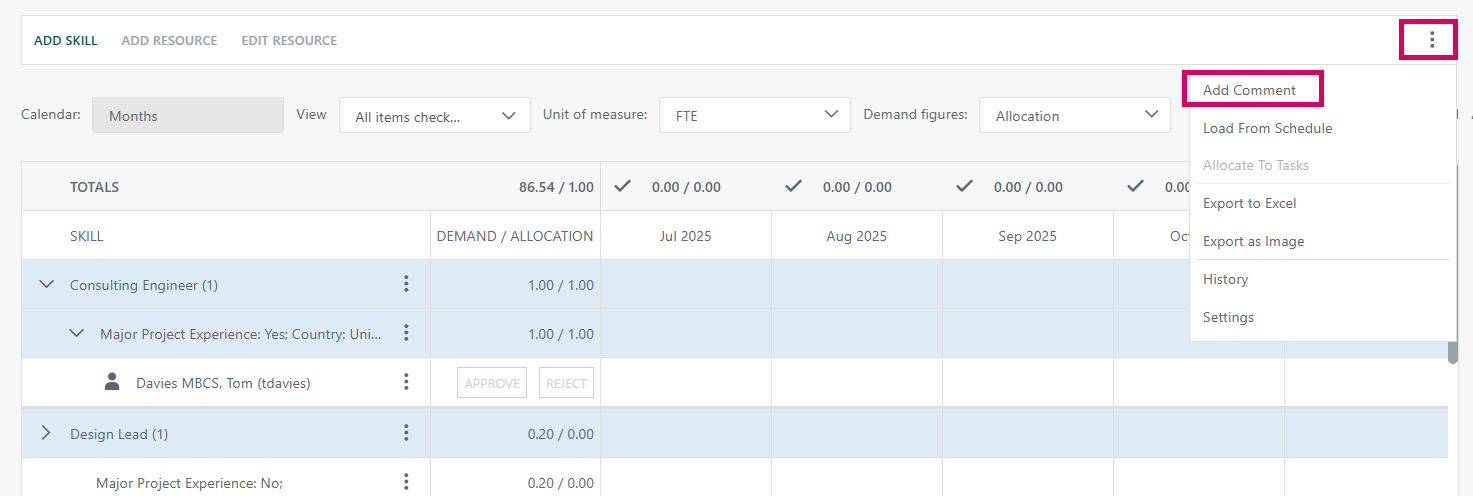
9. Add a Comment
- Open the ⋮ menu (top right) and choose Add Comment.
- Type your note — for example, why a request was rejected or context for an approval.
Click Save.
10. View Tasks for a Sub-Skill
- Open the ⋮ menu on a sub-skill's row and choose View Tasks (only available if your organization has task-level assignments turned on).
- Review the read-only list: Task ID, Description, Start Date, Finish Date, Duration, Status.
- Close the window when you are done.
11. Allocate Approved Resources to Tasks
This step turns an approved resource into scheduled work on the project — a separate action from being "Allocated" to the skill line in Step 5.
- Once at least one resource is approved, open the ⋮ menu and choose Allocate to Tasks.
- Choose a Skill from the dropdown to reveal its task-planning grid.
- Review each task's Start, End, Duration, and % Complete alongside Skill Required, Approved Resource, and current Distribution.
- Enter the Effort to assign per task, choosing whether it is in Days, Hours, or % — or click Auto Allocate to have Cora PPM distribute the approved effort across matching tasks automatically.
- Click Save to finalize, or Cancel to discard.
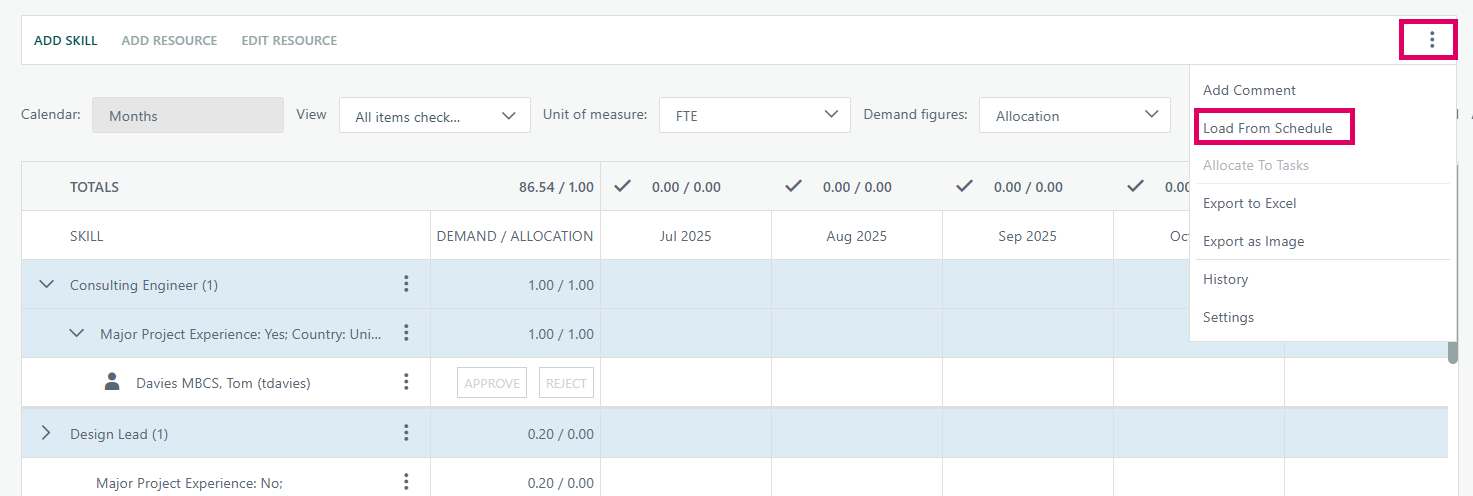
12. Load Demand From the Project Schedule
- Open the ⋮ menu and choose Load From Schedule.
- In the window that opens, review the staffed assignments already reflected in the project's schedule.
Confirm to import them as new demand lines, so you do not have to re-key resourcing that is already in the plan.
13. Export or Review History
- Open the ⋮ menu and choose Export to Excel or Export as Image to save what you are looking at.
Open the ⋮ menu and choose History to see a log of every approval and rejection decision on this project.
14. Adjust Settings
- Open the ⋮ menu and choose Settings — only the project owner can make changes here; everyone else sees a read-only view.
- Set the Resourcing Department this project reports under.
- Set the Demand Deviation Threshold — how far actual resourcing can drift from plan before it is flagged.
Save your changes.
Gotchas: Clicking ADD RESOURCE or EDIT RESOURCE with nothing selected will not work — both stay grayed out until you have selected the relevant skill or resource row first.
FAQ
What's the Difference Between Being "Allocated" to a Skill and "Allocated to a Task"?
Being Allocated (the All status) means a resource has been proposed against a skill's demand, independent of whether it has been approved. Allocating to a Task is a separate, later step — mapping an already-approved resource onto the project's actual task schedule, via the Allocate to Tasks action. The word "allocate" is used both ways on this screen; keep them distinct when training end users.
Who Can Approve or Reject a Request?
It depends on your organization's resourcing model: a Demand Approver or Demand Supply Approver under the Organization model, or a Resource Manager under the Group model.
What Happens When I Reject a Request?
The cell is marked Rejected (Rej) and the decision is logged to History. There is no built-in reason field on the rejection itself — use Add Comment if you need to record why.
Why is ADD RESOURCE Grayed Out?
You need to select a skill or sub-skill row first. Both ADD RESOURCE and EDIT RESOURCE start disabled until a row is selected.
What's the Difference Between Switching Demand Figures to Allocation vs. Gap?
Allocation shows how much has actually been proposed or approved against each skill and period. Gap shows the shortfall or surplus — Demand minus Allocation — directly, so you do not have to do the subtraction yourself.
Can I Change a Skill Once a Demand Line is Created?
No — the skill selector is locked once the line exists. Editing a skill demand line only changes its per-period demand figures.
What Does Load From Schedule Actually Import?
It opens the project's schedule/Gantt view and pulls in assignments that are already staffed there, adding them to this screen as new demand lines — so resourcing that is already reflected in the plan does not need to be re-keyed here.
What Does Auto Allocate Do?
Inside Allocate to Tasks, it automatically distributes an approved resource's effort across the matching tasks for you, instead of you entering the effort on each task by hand.
Who Can Change the Settings for This Screen?
Only the project's owner. Everyone else sees a read-only view of the Resourcing Department and Demand Deviation Threshold.
Was this article helpful?
That’s Great!
Thank you for your feedback
Sorry! We couldn't be helpful
Thank you for your feedback
Feedback sent
We appreciate your effort and will try to fix the article