Capacity Management: Scenario Planning
Scenario Planning lets you build a "what-if" copy of a portfolio, program, or product's demand — adding, removing, changing dates, or reprioritizing projects — and immediately see the effect on resource capacity, without touching the live schedule. Cora PPM computes the resulting demand for every skill or role across the time window you choose, plots it against how much capacity is available, and lets you save the result as a named scenario you can return to, compare later, or discard.
In practice, the screen answers one question repeatedly: if this set of work goes ahead on this timeline, do we have enough people — with the right skills, in the right months — to deliver it?
Key idea: A scenario is a rehearsal, not a commitment. Nothing you do on this screen changes a real project's schedule or resourcing until you deliberately act on what you learned.
Why Customers Use It
Use | Reason |
|---|---|
De-risk the roadmap before you commit. | Test whether a candidate set of projects is resourcable before it's approved, funded, or promised to a customer — catch the overload in planning, not in delivery. |
Make trade-offs visible. | Compare "start Project B in March" against "start it in June" side by side, with the FTE and cost impact quantified instead of argued from memory. |
Justify hiring or contractor spending. | Turn a demand spike into a number a finance or resourcing conversation can act on, months ahead of the shortfall actually occurring. |
Protect committed work. | See exactly which skill lines go over capacity, and in which month, before adding a new project starves the ones already in flight. |
Give every stakeholder the same picture. | A saved, named scenario is a shareable artifact — leadership, resource managers, and delivery leads review the same what-if rather than reconciling separate spreadsheets. |
Keep a decision trail. |
|
Common Use Cases by Project Environment
The mechanics are identical everywhere — pick a window, load candidate projects, and read the gap. What differs is which gap hurts most.
Manufacture-to-Order
Use Case | Details |
|---|---|
Order-book feasibility | Before quoting a delivery date on a new customer order, model it alongside existing orders to confirm design and production-engineering capacity can support the date. |
Line and cell contention | Check whether two large orders scheduled in the same window compete for the same specialist stations or test equipment, not just the same headcount. |
Bid go/no-go | Run a scenario per competing bid to see which one the current workforce can absorb without expediting fees or subcontracting. |
Pharma
Use Case | Details |
|---|---|
Regulatory-milestone protection | Confirm Regulatory Affairs and QA capacity can support a submission deadline before it's locked into a filing commitment. |
Trial start-up sequencing | Stagger new study start-ups against Clinical Ops and Data Management demand so no single quarter needs more trained staff than exists. |
Tech-transfer overlap | Model a product moving from development into manufacturing to catch the handoff window where both teams need the same process-engineering skill set. |
Capital / EPC Projects
Use Case | Details |
|---|---|
Multi-project engineering contention | The case shown in this guide's example: an EPC portfolio checking Engineering, Process, and Design Lead demand across concurrent capital projects. |
Long-lead specialist scarcity | Model demand for scarce disciplines, such as System Architects, wind tunnel time, or Regulatory Officers, years out where lead time to add capacity is long. |
Phase-gate readiness | Before a project crosses FEED into detailed design, confirm the next phase's resourcing before authorizing spending. |
?️ GovCon
Use Case | Details |
|---|---|
Proposal staffing credibility | Prove, with a number rather than an assertion, that a proposed staffing plan is deliverable against the agency's period of performance before it's submitted. |
Contract-vehicle load balancing | See total demand across every task order drawn from one contract vehicle, so a new award does not silently starve an existing one. |
Cleared-labor scarcity | Model demand against the specific pool of cleared or credentialed staff, which cannot be backfilled on short notice the way general labor can. |
Acronyms & Terms Used on This Screen
Term | Stands For | What It Means Here |
|---|---|---|
PPM | Project Portfolio Management | The overall discipline — and this product — of managing a set of projects as a single portfolio rather than in isolation. |
FTE | Full-Time Equivalent | The unit on the Demand chart's vertical axis — one FTE is one person working full-time for the period shown. |
DMD | Demand | The scheduled, resourced requirement a project generates for a given skill in a given month. |
VDMD | Virtual Demand | Estimated or placeholder demand — headcount a project will need but has not yet booked to a specific person — used so the scenario still reflects realistic load before assignments are firm. |
DIFF | Difference | VDMD minus DMD — the gap between estimated and firmly scheduled demand, flagging where a project's real resourcing has not caught up with its plan. |
COST VDMD / COST DMD / COST DIFF | Cost-weighted versions of the above | The same three figures expressed in currency instead of headcount, so a capacity gap can be read as a budget number. |
EPC | Engineering, Procurement & Construction | The capital-projects delivery model shown in this guide's example portfolio. |
GovCon | Government Contracting | Delivery work performed under a government contract or contract vehicle. |
MTO | Manufacture-to-Order (Make-to-Order) | A manufacturing model where production starts only once a customer order is confirmed. |
QA | Quality Assurance | Appears both as a discipline, such as QA Analyst, and a project-management activity. |
Virtual project | — | A placeholder project created inside a scenario to model candidate or not-yet-approved work — it exists only in that scenario until acted on. |
Review note: Confirm the exact DMD, VDMD, DIFF definitions and Virtual Project dialog labels in a live environment before distributing this guide to customers, since wording can vary by version or configuration.
Step-by-Step: Using the Scenario Planning Screen
Each task below is self-contained — jump to the one you need. They are ordered in the sequence you would typically work through when standing up a new scenario.
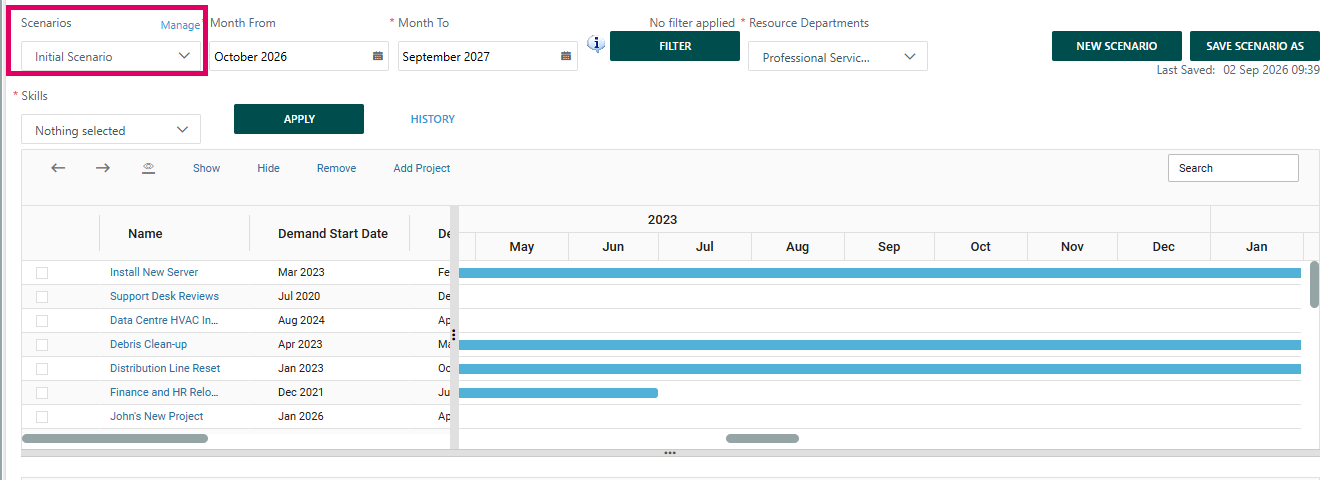
1. Select or Create a Scenario
- Open the Scenarios dropdown at the top-left of the screen.
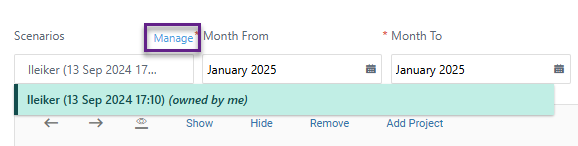
Select an existing scenario from the list — each entry is named by author and save time, for example lleiker (13 Sep 2024 17:...) — to load it, or click New Scenario to clone the current live plan into a new, editable sandbox.

If you no longer need a saved scenario, click Manage, locate it in the list, and remove or rename it there.
2. Set the Analysis Window
- Click into the Month From field and pick the first month you want included in the calculation.
- Click into the Month To field and pick the last month.
Click Apply. The project grid, Demand chart, and Skills table all refresh to the new window.

Narrow the window to zoom in on a single crunch period, or widen it to see a project's full life cycle.
3. Filter to the Resources That Matter
- Open the Resource Departments dropdown and check only the departments you want to include, or leave All items checked for no filter.
- Open the Skills dropdown and check only the skills you want to isolate — for example, uncheck everything except Engineering Lead and System Architect.
Click Filter to apply both selections.

4. Add an Existing Project to the Scenario
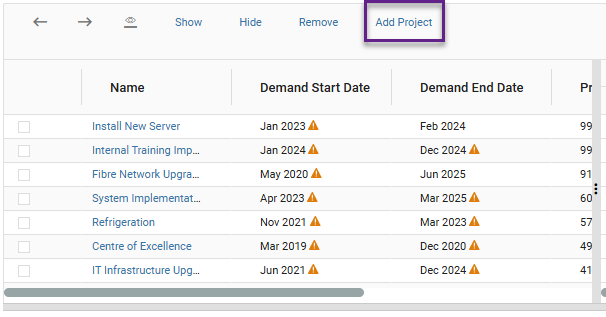
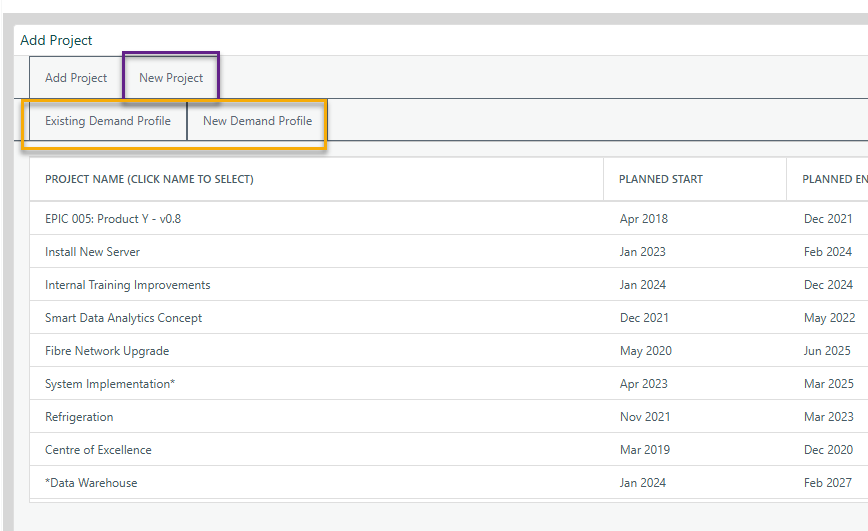
- In the project grid, click Add Project.
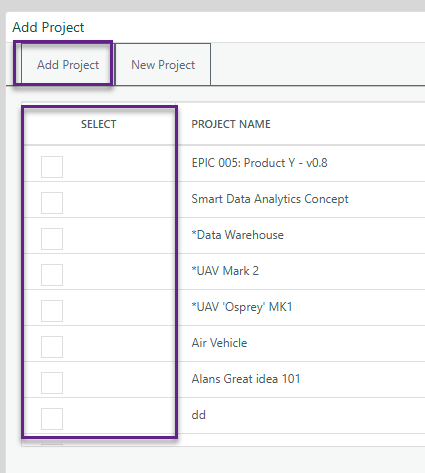
- In the picker that opens, search or browse for the real project you want to include and select it.
Confirm the selection to close the picker. The project now appears as a new row in the grid, with its existing Demand Start Date, Demand End Date, and Priority carried in.
5. Create a Virtual Project
Use this when you want to test a candidate, proposed, or not-yet-approved piece of work that does not exist in the live portfolio yet — for example, a bid you have not won, or a capital project still awaiting approval.
- In the project grid, click Add Project.
- In the dialog that opens, choose the option to create a new virtual or placeholder project rather than selecting one from the existing portfolio list.
- Enter a Name. It is good practice to prefix it clearly, for example "VIRTUAL – West Wing Retrofit," so it is easy to spot and remove later.
- Set a Priority so it sorts and competes for capacity the same way a real project would.
- Set the Demand Start Date and Demand End Date. These bound the months the project is allowed to carry demand.
Click Save to close the dialog. The virtual project now appears as a new row in the project grid, alongside the real projects already in the scenario.
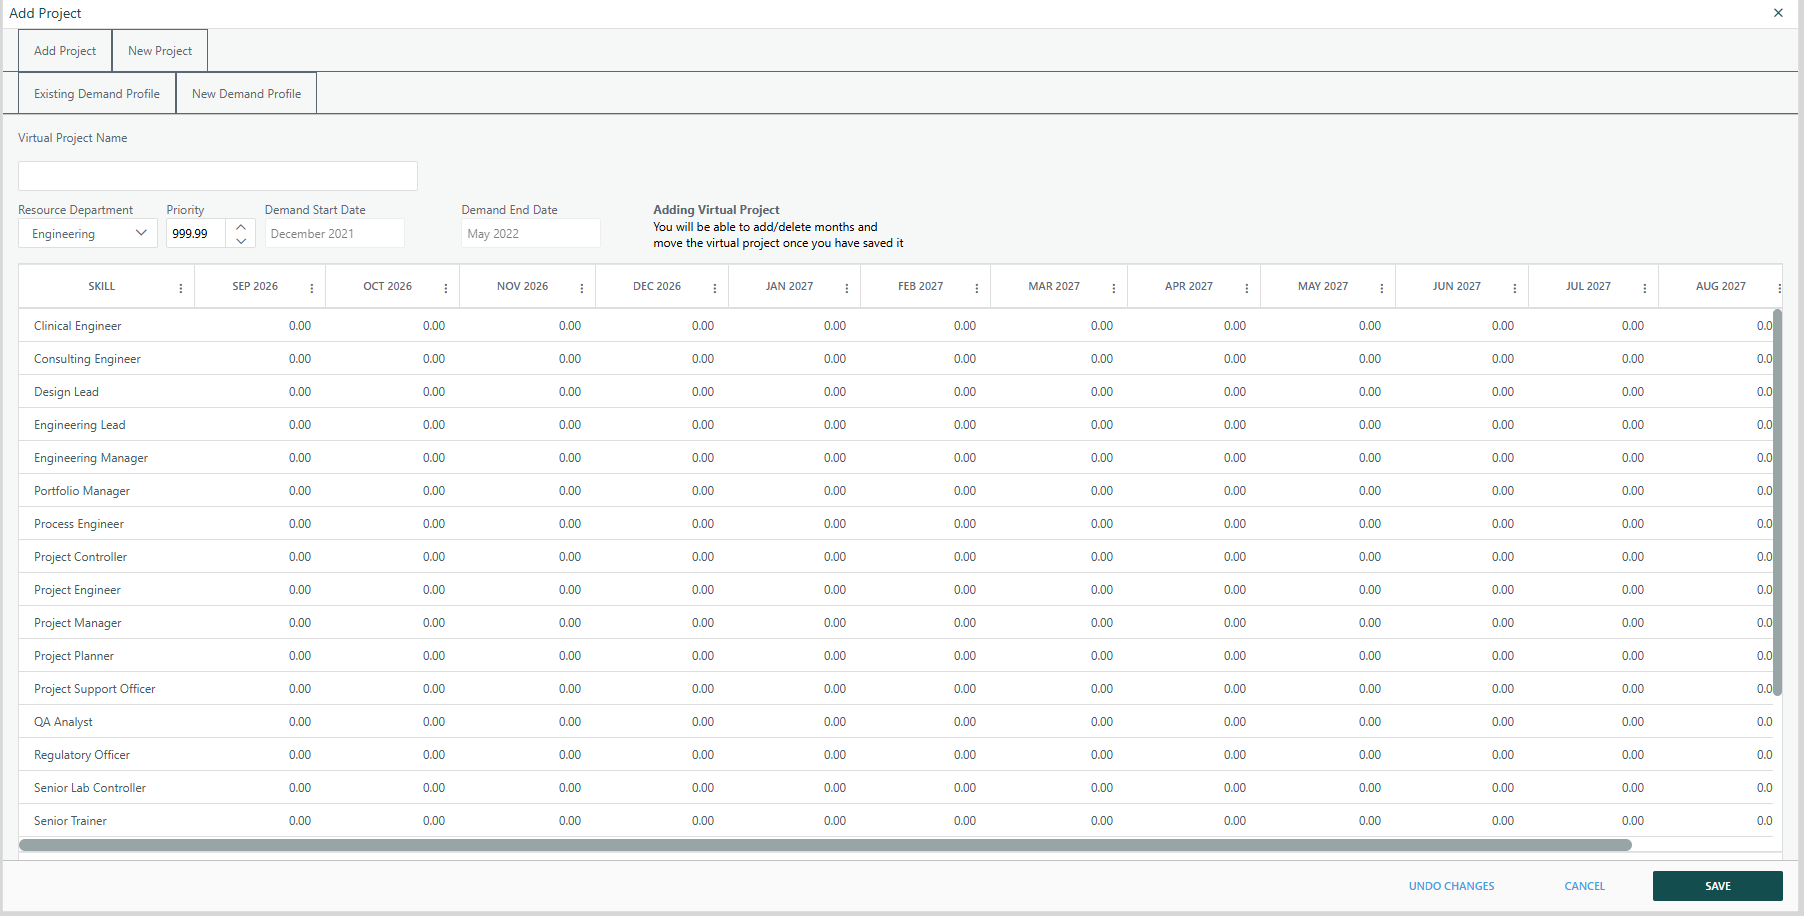
A virtual project exists only inside this scenario. It has no effect on the live portfolio until someone deliberately promotes it — for example, by formally creating and approving it once the scenario shows it is resourcable.
6. Enter Virtual Demand for a Project
Do this for a virtual project that has no real resourcing yet, or for a real project before its assignments are firm.
- In the project grid, select the checkbox next to the project you want to add demand to, so it is included in the calculation.
- Scroll down to the Skills table and locate that project's row.
- Find the column for the month and skill you want to plan. Columns are grouped by month, such as Jan 2025, each with
VDMD,DMD,DIFF,COST VDMD,COST DMD, andCOST DIFFsub-columns. - Click into the
VDMDcell for that month and skill, and enter the estimated FTE or hours the project will need, depending on your configuration. - Repeat for every skill and month the project needs — for example, 0.5 FTE of Engineering Lead from January through March, and 1 FTE of Process Engineer from February through April.
- If prompted for a cost rate that is not already set, enter it so
COST VDMDcalculates automatically. - Click Apply, or Filter if you also changed a filter, to refresh the Demand chart.
- Check the Demand chart: the new demand appears as an added segment on the relevant month's bar, and you can see whether it pushes that month over the red Available Capacity line.
Later, once real resourcing is confirmed, enter the equivalent figure in the DMD column for the same row. DIFF recalculates automatically to show the gap between the original plan and what has been booked.
7. Read the Demand Chart
- Check the legend above the chart to see which skill or role each color represents.
- Read each bar as total demand for that month, stacked by skill.
- Compare the bar height to the red Available Capacity line. A bar crossing the line means that month is over capacity for the filtered skills; a bar well under it shows Spare Capacity.
- Look for the Virtual Demand segments specifically. These call out estimated load that is not yet tied to a named resource.
8. Adjust Capacity Assumptions
- Click Edit Capacity, above the Demand chart.
- Update the assumption for the affected department or skill — for example, add headcount for contractors who are about to be onboarded.
- Save the change and return to the scenario. The Demand chart and Available Capacity line recalculate automatically.
Use this when the shortfall is a capacity-modeling problem rather than a demand problem.
9. Drill Into the Exact Numbers in the Skills Table
- Scroll to the Skills table below the chart.
- Locate the project and month you are checking.
- Read across
VDMD,DMD, andDIFFfor the FTE or hours view, andCOST VDMD,COST DMD, andCOST DIFFfor the budget view.
This is where a visual "the bar is over the line" becomes an exact FTE and dollar figure you can quote in a resourcing or budget conversation.
10. Export and Share
- Above the Demand chart, click the PDF icon to export the chart as a PDF, or the Excel icon to export it as a spreadsheet.
- Above the Skills table, click the Excel icon to export the full skills breakdown.
11. Save the Scenario
- Once you are satisfied with the scenario, click Save Scenario As.
- Give it a clear, descriptive name and confirm.
- To discard your changes instead, simply navigate away without saving.
12. Review Scenario History
- Click History, next to the date fields.
- Browse the list of previously saved states for this scenario.
- Open an earlier version to review or restore it.
Common mistake: Remember to click Filter or Apply after changing a dropdown or date. The Demand chart and Skills table recalculate only after you do.
FAQ
- Does Changing Something in a Scenario Affect the Real Project? No. A scenario is a separate, editable copy. Real project dates, resourcing, and budgets are untouched until someone deliberately takes an action outside this screen to apply what a scenario showed.
- What Is the Difference Between DMD and VDMD?
DMDis demand that is actually scheduled — hours or FTE tied to the project plan.VDMDis virtual demand: an estimate of what a project will need before it has been broken down into firm, resourced assignments. Comparing the two through theDIFFcolumn shows how far a project's real resourcing has caught up with its planning assumption. - What Does the Red Line on the Demand Chart Represent? Available Capacity — the total FTE your organization can supply for the filtered skills and departments in that month. Bars rising above the line indicate a shortfall; adjust the underlying assumption through Edit Capacity.
- Why Is a Month Showing No Bar at All? Either no included project has demand for the filtered skills in that month, or the month falls outside your current Month From/Month To window. Widen the window or clear a skill or department filter to check.
- Who Can See a Scenario I've Saved? Visibility follows your organization's Cora PPM security and portfolio-access configuration — typically scenarios are visible to people with access to the same program or portfolio. Check with your Cora PPM administrator if you need to confirm visibility for a specific scenario.
- How Is This Different From Just Editing the Live Project Plan? Editing the live plan changes real commitments immediately and is visible to everyone working from it. A scenario is disposable and private to your what-if — you can add, remove, or change dates on a dozen projects, see the capacity impact, and discard the whole thing if the answer is not useful.
- Can I Test More Than One Option at Once — for Example, Two Different Start Dates for the Same Project? Save each option as its own named scenario through Save Scenario As, then switch between them from the Scenarios dropdown to compare the resulting Demand charts side by side.
- What Should I Do When I Find an Over-capacity Month? There are generally three levers: change the date of the project causing the spike, remove or reduce its scope in this scenario, or revisit the capacity assumption itself through Edit Capacity if more staff are genuinely coming on. The Skills table's
COSTcolumns help decide which lever is cheapest. - What Is a Virtual Project, and When Should I Use One Instead of a Real Project? A virtual project is a placeholder that exists only inside a scenario — use it to test demand for work that has not been formally created yet, such as an unapproved bid or a capital project still awaiting approval. Once the work is approved, it should be created as a real project in the live portfolio; the virtual version was only a rehearsal.
- Can I Turn a Virtual Project Into a Real One Once It's Approved? The virtual project itself stays inside the scenario. Once work is approved, create it as a real project in the live portfolio, then use Add Project to bring the real version into future scenarios — the virtual copy can be removed at that point.
Was this article helpful?
That’s Great!
Thank you for your feedback
Sorry! We couldn't be helpful
Thank you for your feedback
Feedback sent
We appreciate your effort and will try to fix the article