Project Registers: Administration - Nested Grids

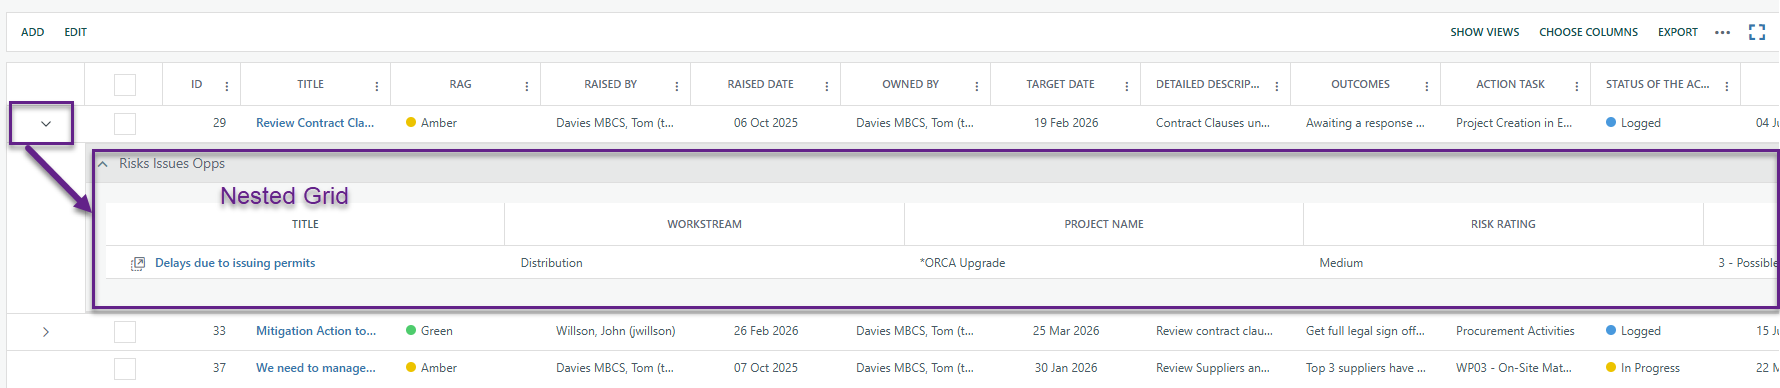
A Nested Grid is a collapsible, expandable sub-table that appears inside a row of a project register. When a user clicks the expand chevron (▶) on a register record, instead of just seeing the record's fields, they also see one or more additional data grids rendered beneath that row — each showing a different category of related information. This "parent–child" visual structure is where the name "Nested Grid" comes from.
Why would someone use Nested Grids?
Nested Grids exist to give users a richer, contextual view of all the things connected to a single register entry without having to navigate away. Three distinct types of related data can be surfaced as nested grids:
- Tasks – Project schedule tasks that have been linked to the register entry are shown with selectable columns such as Task Name, Start Date, Finish Date, % Complete, Status, and Project Name. Custom task fields configured in the system can also appear as additional columns. This allows a risk register entry, for example, to show all the mitigation tasks linked to it directly in the same grid row.
- Linked Register Items – Records from another register that have been linked to the current register entry. For instance, a Change Request in one register might be linked to multiple Risk records in another, and those Risk records can be surfaced as a nested grid. The columns available include Project Name, Link Type, and any custom field from the linked register.
- Cost Register (Cost Control) Items – For registers configured as Cost Control registers, linked financial transactions (account codes, cost book lines, amounts, and ordered status) can be displayed as nested rows. The exact columns available depend on whether the Cost Control register uses "None," "Target only," or "Source & Target" enforce mode.
Users can have multiple nested grids configured on a single register — for example, one for Tasks and one for a linked register — and each appears as its own labelled panel when a row is expanded. Rows that have no data for any configured nested grid type do not show a chevron at all, keeping the grid uncluttered.
What is the practical benefit?
Without nested grids, a user wanting to see what tasks are linked to a register entry would have to open the full record detail modal, navigate to the Linked Items tab, and then close it before moving to the next record. Nested grids collapse that workflow: the related data is visible directly in the register grid, scannable without a single click on any individual record.
Export Behavior
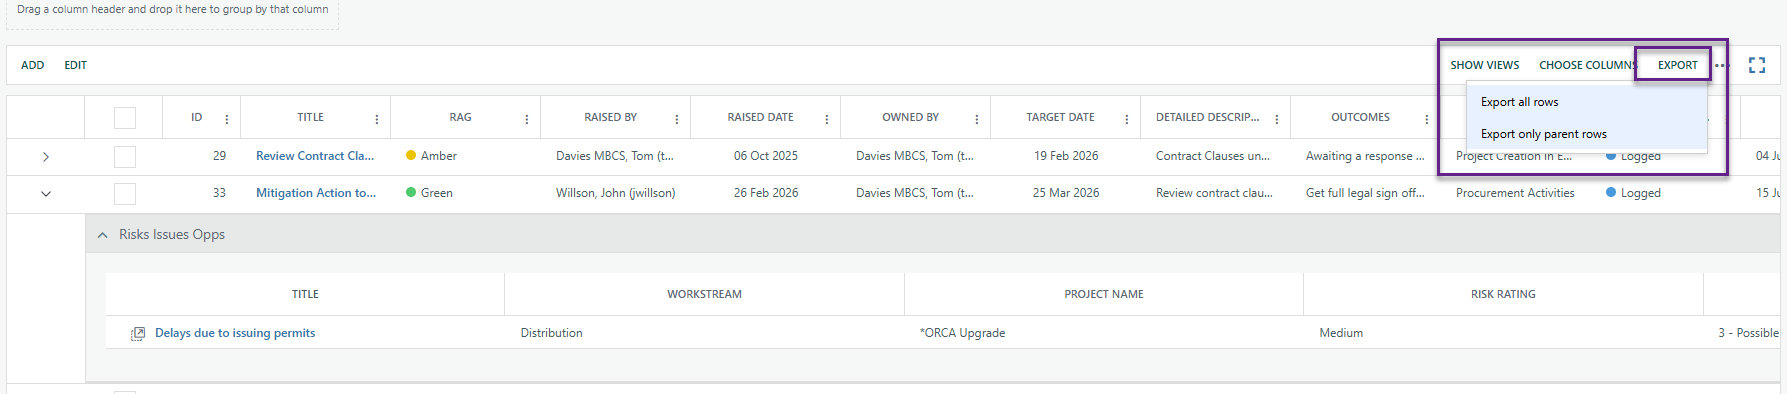
When at least one nested grid is configured, the register's Export button turns into a two-option dropdown: Export all rows (parent + nested) or Export only parent rows. Choosing "all" produces an Excel file in which nested rows are injected beneath each parent row with a bold+italic section label, bold column headers, and data rows indented in column 2. Rows where the user lacks access to the linked project or register are masked exactly as they are on screen.
Prerequisites before you can use Nested Grids
- The register must have "Enable Linked Items" turned on (Options tab of the register configuration). The Nested Grids tab in the configuration is greyed out and disabled if this option is not checked.
- You must have administrator access to the Cora PPM administration area to configure nested grids.
- To nest a linked register, the target register must itself have Linked Items enabled and must not be a Cost Control register (those appear under the separate Cost Register section).
- To nest cost register data, the parent register must be of type Cost Control.
Step 1 – Open the Register Configuration
- Navigate to Admin → Project Registers (or equivalent configuration page for your instance).
- Find the register you want to configure and click to open it.
- If this is a brand-new register, you must first save the basic settings before any other tabs become active.
Step 2 – Navigate to the Nested Grids tab
- Once the register has been saved at least once, click the "Nested Grids" tab at the top of the configuration dialog.
- (If the tab is disabled/greyed out, go to the Options tab and check "Enable Linked Items", then save.)
Step 3 – Add a new Nested Grid
- On the Nested Grids tab, click the Add button (the "+" button in the grid toolbar).
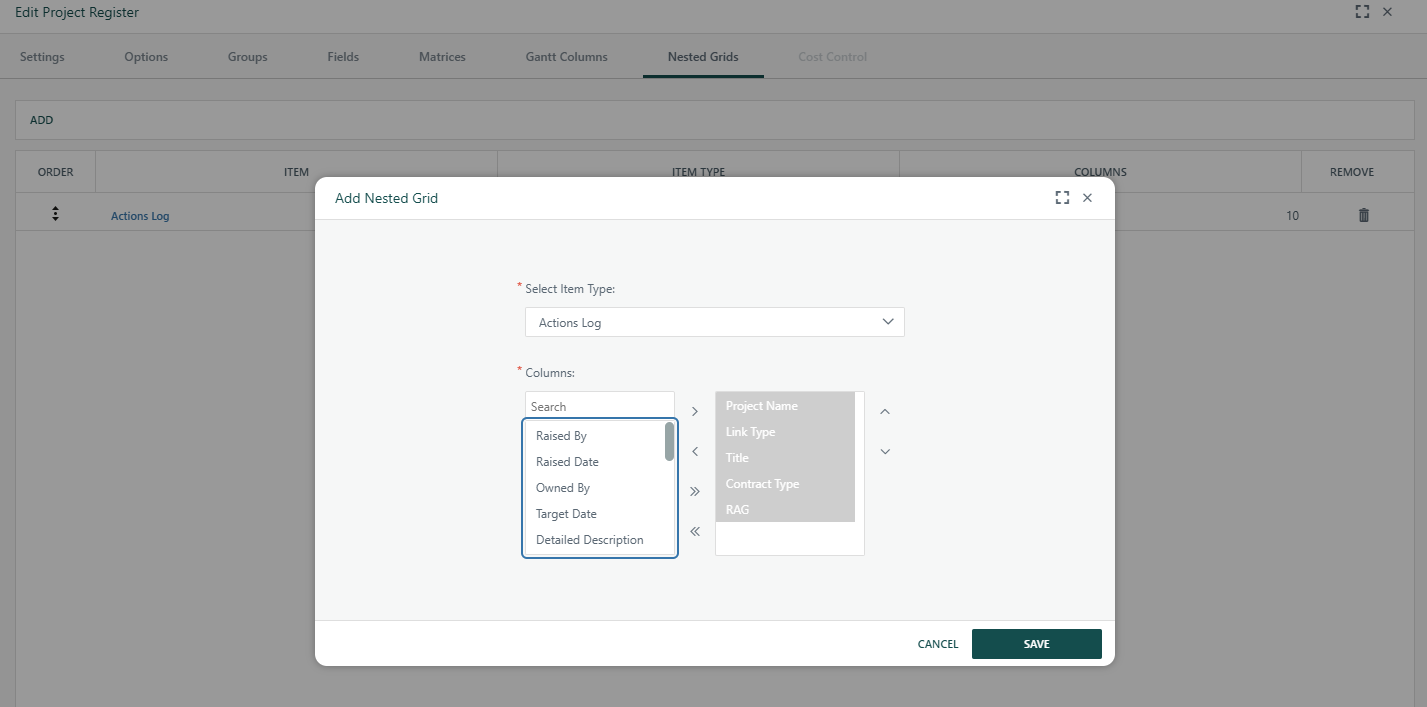
- A popup dialog titled "Add Nested Grid" opens.
Step 4 – Select the Item Type
In the popup you will see two controls:
"Select Item Type" dropdown — this is the most important choice. It determines what data the nested grid will show. The options are:
What you see in the dropdown | What it means |
|---|---|
Tasks | Schedule tasks linked to the register entry |
[Name of another register] | Records from that register that have been linked via the Linked Items tab of a record |
[Name of a Cost Control register] (only visible if the parent register is a Cost Control register) | Financial transaction rows from that cost register |
Important: Only registers that have "Enable Linked Items" turned on appear in the dropdown. Cost Control registers only appear if the parent register is itself a Cost Control register of the same type.
Step 5 – Select the Columns
After selecting an Item Type, the Columns swap-list (a two-panel pick list) will populate with all available columns for that item type:
For Tasks:
- Task Name, Task Id, Start Date, Finish Date, % Complete, Status, Project Name (built-in columns)
- Any custom Task Manager fields configured in your system appear below those
For Linked Registers:
- Project Name, Link Type (built-in)
- Any custom fields defined on that target register
For Cost Registers:
Columns vary by the "Enforce Source/Target" setting on that register:
- None mode: Account Code, Cost Book Line, Amount, Ordered Checkbox
- Target mode: Target Account Code, Target Cost Book Line, Amount, Ordered Checkbox
- Source & Target mode: Source Account Code, Source Cost Book Line, Target Account Code, Target Cost Book Line, Amount, Ordered Checkbox
Move the columns you want displayed from the left list to the right list. A maximum of 10 columns are allowed per nested grid. If you try to save with more than 10, you will receive an error and the right-hand list will be highlighted in red.
Step 6 – Save the Nested Grid
Click the Save button in the dialog (or the dialog's save button in the footer). You will see a success toast. The nested grid configuration list will refresh and show your new entry.
Step 7 – Reordering Nested Grids
If you have configured multiple nested grids, their display order matters — they appear in this order when a row is expanded. You can drag and drop rows in the Nested Grids grid list using the drag handle (the up/down arrow icon in the Order column) to rearrange them.
Step 8 – Editing an existing Nested Grid
Click the clickable name link (the Item column, which shows the item type name as a link) in the nested grid list row. The same popup opens pre-filled with the existing settings. Change the item type or columns and save.
Step 9 – Deleting a Nested Grid
Click the bin/delete icon in the Remove column. Confirm the deletion prompt. The nested grid definition is removed; no register data is deleted.
Step 10 – Verifying the result at runtime
- Navigate to the register on a project.
- Any record that has linked items of the configured type will show a ▶ expand chevron in the leftmost column.
- Records with no linked data for any configured nested grid show no chevron.
- Click the chevron to expand; the nested grid panel(s) appear below the row, each labelled (e.g. "Tasks", or the register's display name).
- The panel automatically collapses if there is no data for that parent row.
Tips and Important Items to Know
- "Enable Linked Items" must be on. This is the single most common reason the Nested Grids tab is greyed out.
- The dropdown shows all registers with Linked Items enabled — if the register you want to nest is not in the list, check that it has Linked Items enabled in its own Options tab.
- Cost Control registers are only available as nested grids on parent registers that are themselves Cost Control registers of the same Cost Control type.
- Column limit is 10. Plan your column selection carefully — fewer columns make the nested grid much easier to read.
- Export: Once nested grids are configured, the Export button shows a dropdown. "Export only parent rows" replicates the old behavior. "Export all rows (parent + nested)" injects the child data below each parent row in the Excel file, respecting your access rights.
- Access masking in nested grids: If a user does not have access to the project of a linked task, the Start Date, Finish Date, and % Complete columns will be blank for that task row. If a user does not have access to a linked register, only Description, Owned By, and Status are visible; all other columns are blank.
Was this article helpful?
That’s Great!
Thank you for your feedback
Sorry! We couldn't be helpful
Thank you for your feedback
Feedback sent
We appreciate your effort and will try to fix the article