Administration - Users in Cora PPM
Smart Button
Related Pages: [link to Licensing overview, Custom Roles reference, if they exist]
Where to Find User Management in Cora PPM
Go to Administration → Resources → Users. From here you can:
- View the user list
- Add a new user
- Edit an existing user by clicking their name
Details Tab
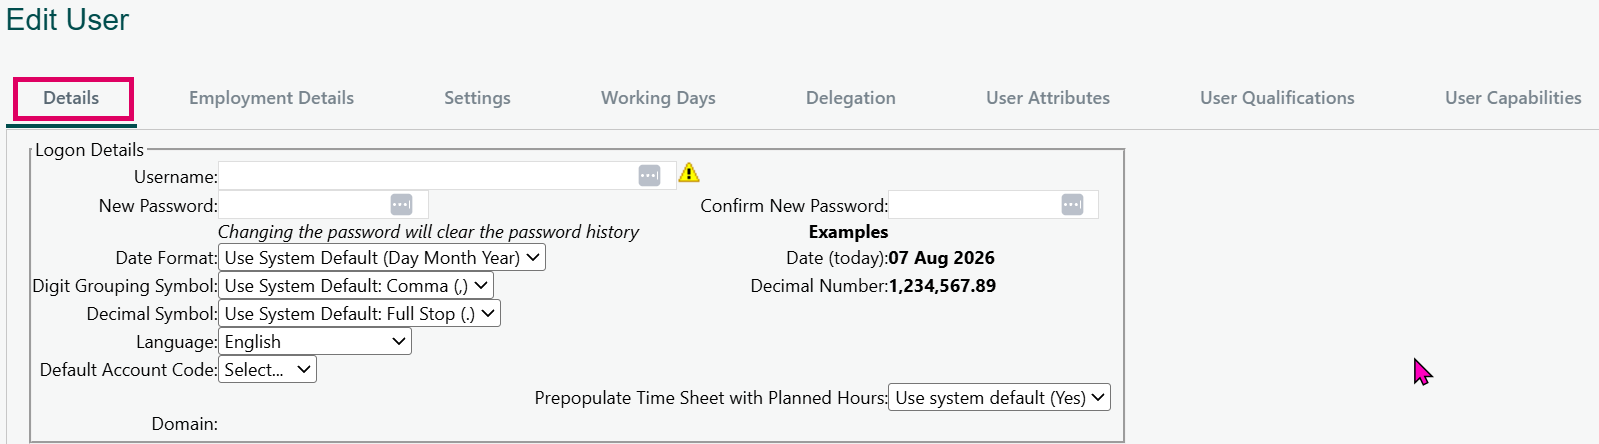
The Details tab in Edit User is the first and primary tab of the Edit User page in Cora PPM's Administration area. It is the default view when an administrator opens any user record. The tab gathers all the identity, access, preference, and contact information that defines who the user is and how they interact with the system. It is organised into five distinct fieldset sections, plus a few standalone controls.
Logon Details is the topmost section. This is where the user's username, password management, display format preferences, and login page are configured. Administrators can set or change the username, assign a new password (with confirmation), and optionally select the date format, digit grouping symbol, and decimal symbol that will be used throughout the interface for that user. Live examples are shown alongside the format dropdowns so the effect of each choice is immediately visible. A language selector allows the administrator to assign a UI language to the user. A "Login Page" dropdown determines which page the user lands on after signing in. Optionally, a Default Account Code can be assigned. If the Timesheet module is configured with "prepopulate planned hours" set to a user-selectable mode, a prepopulation preference appears here too.
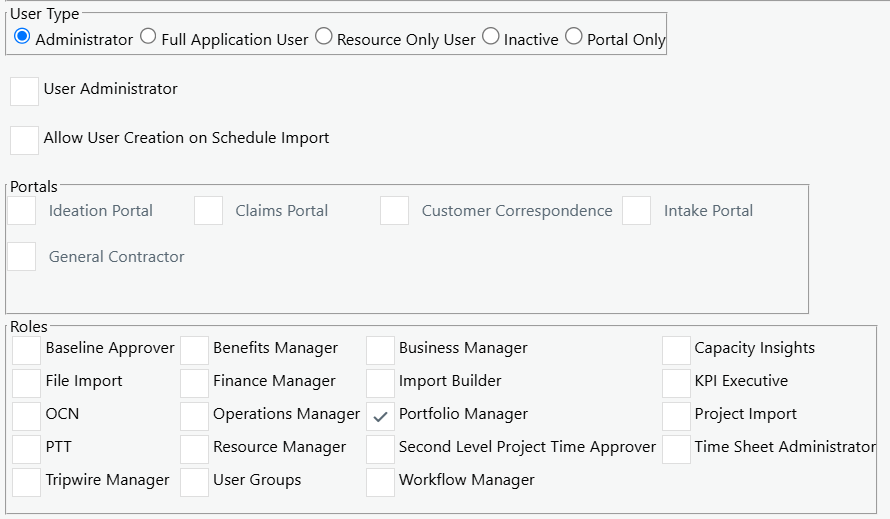
User Type is a radio button group below the Logon Details section. It determines the user's core licence type and system access level: Administrator, Full Application User, Resource Only User, Inactive, or Portal Only. Selecting "Inactive" effectively disables the account. The "Portal Only" option is hidden if no portals are configured.
Standalone checkboxes sit below User Type:
- User Administrator grants the user elevated admin permissions on the user administration module, and when ticked it reveals an additional User Administrator Groups swap-list on the Settings tab.
- Allow User Creation on Schedule Import permits the system to automatically create new users when a schedule file is imported.
Portals appears as a checkbox list of all configured portal products, allowing the administrator to grant the user access to one or more Cora portals. The section is hidden if no portals exist.
Roles contains the custom application roles that extend the user's access beyond their base user type. These are rendered as a checkbox list (one checkbox per role) or grouped dropdown lists. Whether a role checkbox appears depends on which optional modules are licensed or configured (Invoicing, Cost/Benefit, Capacity, Finance Manager, Workflow Manager, etc.).
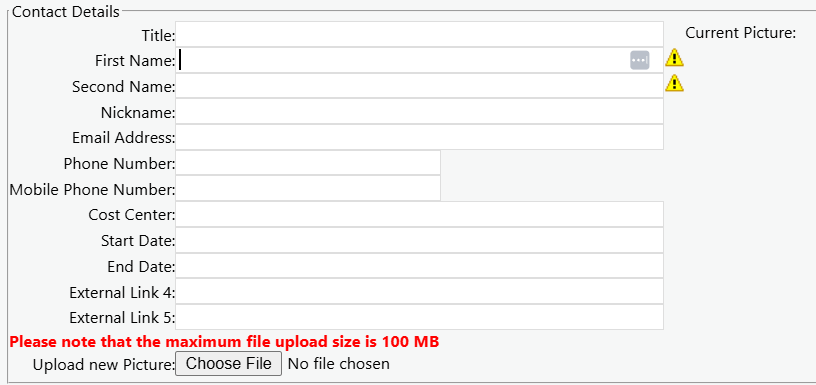
Contact Details captures the user's personal and communication data: Title, First Name, Second Name, Nickname, Email Address, Phone Number, Mobile Phone Number, up to five configurable external link fields (whose labels can be translated and customised per deployment), plus the ability to upload and remove a profile picture.
Together, the fields on this tab control: whether the account is locked, how the account authenticates (manual password vs SSO), what the user can see and do in the system, and how numbers and dates are formatted for them personally.
Setting a User's Type (New or Existing User)
On both the New User and Edit User screens, look for the radio button group labelled User Type.
The options are:
Radio Value | Label |
|---|---|
1 | Administrator |
2 | Full Application User |
3 | Resource Only User |
4 | Inactive |
5 | Portal Only User (only shown if Portals are configured) |
New users default to Full Application User.
Custom Roles
On the same Edit User screen, after selecting the primary user type, you will see a checklist of Custom Roles (e.g. Timesheet Administrator, Portfolio Manager, etc.). Tick the relevant boxes. Some roles are grouped in dropdown lists rather than checkboxes (for example, Honeywell-specific multi-role groups). Click Save to apply.
User Administrator
Below the Custom Roles section there is a checkbox labelled User Administrator. Ticking this makes the user a delegated user manager. When ticked, a User Type Groups swap-list appears, allowing you to specify which groups of users this person is allowed to manage.
Activating / Deactivating Users
- To deactivate a user, select "Inactive" from the User Type radio buttons and save, they can no longer log in.
- To re-activate, change the type back to the appropriate active type.
- A user can also have a Termination Date set. This date can automatically deactivate accounts.
- If a user is account-locked (too many failed logins), an Unlock button appears on the edit screen.
Licence Limits
Full Licences and Resource Only Licences are separate pools, checked whenever you create or change a user:
- Changing someone to Administrator or Full User checks the Full Licence pool.
- Changing someone to Resource Only checks the Resource Only Licence pool.
If a quota's exhausted, you'll see: "Cannot modify this user: the number of licenced 'Full Users' would be exceeded. Please contact Cora Systems." Review existing active users and deactivate anyone no longer needed before adding new ones.
Note: Cora-email-domain accounts (internal Cora Systems test/support accounts) are exempt from licence counting.
Sending Welcome / Password Emails
When creating a user, administrators can click Create Password instead of Save. This generates a time-limited password setup link and emails it to the user's registered address. On the edit screen, the Reset Password button resends this link. These buttons are only visible when email notifications are configured and (for SSO environments) when manual logon is permitted.
Important Notes
- The last Administrator cannot be demoted. The system will block this action with an error message.
- Resource Only and Full Users consume different licence pools. Changing a user from Resource Only to Full requires a Full Licence to be available.
- Portal Only users will not appear or be selectable if no Portals have been set up.
- Timesheets: The
TimesheetUsercheckbox (separate from user type) controls whether the user submits timesheets. Disabling this is blocked if the user has non-approved timesheets in the system. - Changes to a user's type are fully audited — all changes are written to the history log and, on environments with Azure Sentinel integration, also sent to the security SIEM.
Was this article helpful?
That’s Great!
Thank you for your feedback
Sorry! We couldn't be helpful
Thank you for your feedback
Feedback sent
We appreciate your effort and will try to fix the article