Project Check In

Project Check In is the mechanism in Cora PPM that reverses a project's "checked out" state — restoring it to normal, fully editable status within the system. It is an integral part of the Microsoft Project (MSP) round-trip workflow, which works as follows:
- Export & Check Out: When a project planner exports a project schedule to Microsoft Project format (
.mpp/.xml), they can simultaneously "check out" the project. This marks the project as locked in Cora PPM, signalling to other users that the schedule is being managed externally in MS Project. - Checked-Out State: While a project is checked out, it is protected from conflicting updates inside Cora PPM. The system displays a visible "checked out" indicator in the Project Summary Header, and certain scheduling options are restricted for the project within the system.
- Import & Check In: When the planner is done working in MS Project and re-imports the file, the system automatically checks the project back in as part of completing the import. However, if the import did not occur or the check-in needs to be performed manually — for instance, if the MS Project work was abandoned or the file is being dealt with separately — the Project Check In page provides a dedicated, explicit way to release the lock.
The "CHECK IN" button on the Project Check In page performs one focused operation: it clears the checked-out flag on the project, restores normal project access, refreshes the project summary header to reflect the new state, and writes an audit history entry confirming that the check-in occurred and who performed it.
Where to Find It
The Project Check In page (Project_MSP_Checkin.aspx) is accessed from the project's navigation toolbar while a project is currently selected. It is typically listed under the project's Microsoft Project integration section of the toolbar, alongside the MSP Export and MSP Import pages.
Prerequisites
- A project must be currently selected (a project must be in the session). If no project is selected, the page will show a "Please select a Project" message.
- You must have Full Task/WBS/Gantt rights for the project. Without this security right, the page shows an access-denied message and the Check In button and the check-in icon in the summary header are hidden.
- The Check In action is most meaningful when the project is already in a checked-out state (it does nothing harmful if the project is not checked out, but the flag is already cleared so the operation has no visible effect).
Performing a Manual Check In
- Navigate to the Project Check In page for the selected project.
- You will see the page title "Project Check In" and a teal/green "CHECK IN" button.
- Click the CHECK IN button.
Cora PPM will:
- Clear the
is_checkedoutflag on the project database record. - Refresh the Project Summary Header (so the "checked out" indicator disappears).
- Display a green success toast notification: "Project Successfully checked in."
- Clear the
- The project is now unlocked for normal use inside Cora PPM.
Check In From the Summary Header
There is also a check-in icon available directly in the Project Summary Header bar (the blue bar displayed at the top of every project page). When a project is checked out, this icon becomes visible. Clicking it calls the same underlying check-in logic and produces the same result — without navigating away from the current project page. This is the quicker option if you are already on another project page.
Important Notes & Tips
- Automatic check-in on import: If you re-import the MS Project file via the MSP Import page, the system automatically checks the project back in as the final step of the import process. You do not need to visit the Check In page separately.
- Who can check in: Only users with Full Task/WBS/Gantt/Network Diagram project rights can perform a check-in. Portfolio Managers with project owner rights (profile ID 40) also qualify.
- Audit trail: Every check-in is recorded in the project history as: "Project was checked in." This creates a permanent, user-attributed audit record.
- No data loss: Checking in simply releases the lock; it does not modify, overwrite, or revert any project data.
- Error if no project selected: The page will clear itself and display a message if the session has no selected project. Always ensure you are viewing the correct project before using this page.
Project Export
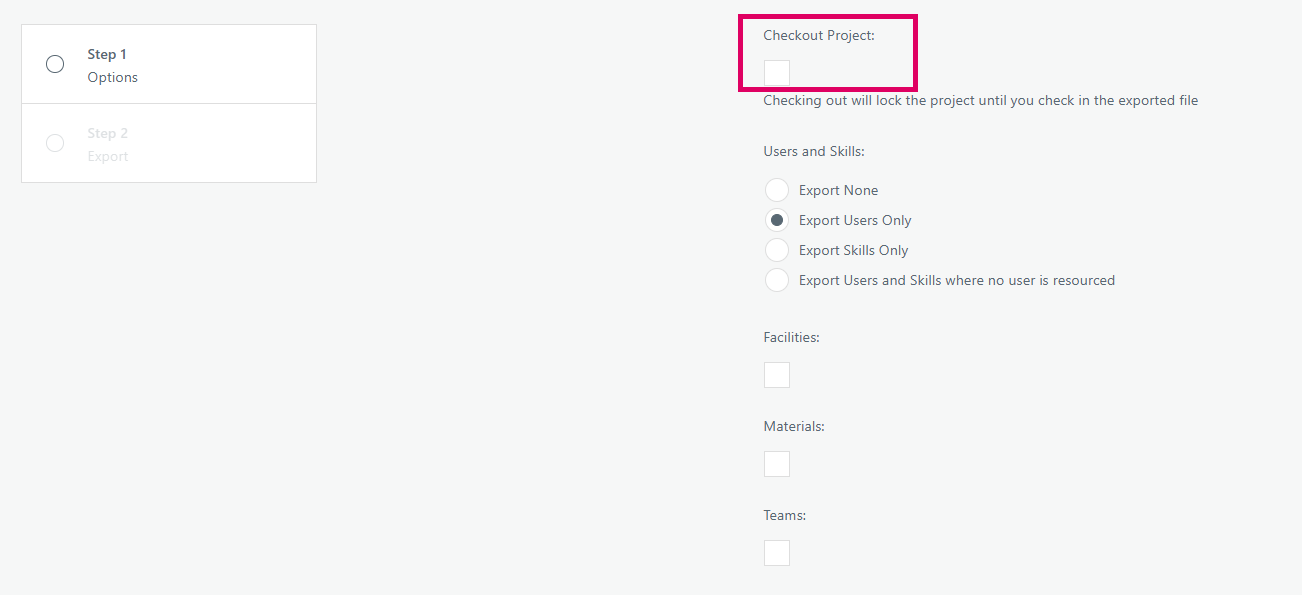
The Project Export Wizard in Cora PPM allows users to export a project's schedule and resource data into a file that can be opened in Microsoft Project (or Primavera). It is a two-step wizard, and what the user sees in the screenshot is Step 1: Options — the configuration panel where the user chooses exactly what data to include before the file is actually generated.
What the wizard does
When a project manager needs to work with a project schedule outside of Cora PPM — for example, to share it with an external stakeholder or edit it in Microsoft Project — they use this wizard. They set their options on Step 1, advance to Step 2 to choose the file format, then click Export to generate and download the file.
The five controls on Step 1
- Checkout Project (checkbox, unchecked by default)
This is the most consequential option on the page. When checked, Cora PPM places a lock on the project immediately when the file is exported. No other user can edit the project until someone performs a Check-In (uploading a new version of the file back into Cora PPM). The purpose is to prevent conflicting changes while the schedule is being worked on externally. The helper text explains it precisely: "Checking out will lock the project until you check in the exported file." The red/pink border highlighted in the screenshot is simply the visual focus state on that control — it is not a validation error or a required-field indicator. The checkbox is enabled only when the project is eligible for export (i.e., all tasks fall within the supported date range of 1 Jan 1984 to 31 Dec 2049); if any tasks fall outside that range, the checkbox is disabled and a warning message is shown instead. Users and Skills (radio button group, "Export Users Only" selected by default)
Controls which resource types are exported as MS Project resources:- Export None — no resources are written to the file at all.
- Export Users Only — only named Cora PPM users who are planned against tasks are exported.
- Export Skills Only — only skill/role demands are exported (no individual users).
- Export Users and Skills where no user is resourced — users are exported first; for any task slot that has only a skill demand and no named user filling it, the skill is also exported.
- Facilities (checkbox, unchecked) — When checked, equipment/facility resources planned against tasks are exported as MS Project resources.
- Materials (checkbox, unchecked) — When checked, material resources are exported.
- Teams (checkbox, unchecked) — When checked, team resources are exported.
Step 2 and the Export
Once the user clicks Next, they reach Step 2 where they choose the output format:
- MPX — legacy format for MS Project 1998–2002.
- XML (MSPDI) — the standard format for MS Project 2002 and later (selected by default).
- XER — Primavera PM XER format.
- PMXML — Primavera P6 XML format.
Clicking Export generates the file server-side and the browser downloads it automatically. If Checkout was selected, the project is locked at this point and the download triggers a page reload to reflect the new checked-out state.
Why the Checkout option exists
Without checkout, someone else could edit the project in Cora PPM while the export file is being worked on externally. When the edited file is eventually imported back in ("checked in"), those external changes would overwrite the Cora PPM edits, or vice versa. Checkout prevents that race condition by acting like a source-control lock: one person holds the project at a time.
How to access the Export Wizard
The MSP Export wizard is accessed from within a project. Look for the Export to Microsoft Project option in the project toolbar or the MSP/Import-Export section of the project menu. You need either the MSP: Can Export or MSP: Can Export and Import project right to see the wizard. Portfolio Managers and users with Profile ID 40 also have access.
Step-by-step: exporting a project
Step 1 — Options (the screen shown in the screenshot)
Checkout Project — decide whether you want to lock the project during the export.
- Leave unchecked if the export is for reference only (viewing, sharing) and you do not mind if Cora PPM continues to be edited.
- Check it if you intend to make real changes in MS Project and import the file back later. Once checked, the project will be locked for all other users until someone checks it back in.
- Important: If any task in the project has a start or finish date before 1 Jan 1984 or after 31 Dec 2049, the checkbox will be greyed out and you will see a warning message. You must fix those task dates before you can export.
Users and Skills — choose a radio button:
- The default Export Users Only is correct for most scenarios where you want to see individual named resources in MS Project.
- Use Export Skills Only if you want demand to appear by role rather than by individual.
- Use Export None for a schedule-only export with no resource columns.
- Use Export Users and Skills where no user is resourced for a complete picture of demand: named users where allocated, skills where only a demand exists.
- Facilities, Materials, Teams — tick any that you need to appear as resource rows in MS Project. These are unchecked by default because most MS Project users only need labour resources.
- Click Next to advance to Step 2.
Step 2 — Export
Choose the Output Format:
- For all modern MS Project versions (2002 onwards) use XML (MSPDI) — this is pre-selected.
- Use MPX only if you need to open the file in a very old MS Project version.
- Use XER or PMXML for Primavera tools.
- Click Export. The file will be generated and downloaded automatically to your browser's downloads folder.
- If you chose Checkout Project, the project status in Cora PPM will now show as Checked Out. Other users can still view the project but cannot save changes to the schedule.
Checking the project back in
After you finish working in MS Project, import the modified file back into Cora PPM using the Import from Microsoft Project function (MSP Import). On import, you will have the option to Check In, which releases the lock.
Tips and common pitfalls
- Red/pink border on Checkout Project: This is a visual focus indicator (the control received keyboard focus), not a validation error. Nothing is wrong.
- Default resource export: The default is "Export Users Only." If your project uses skills or facilities heavily, change this before clicking Next or those resources will be absent in MS Project.
- Date range warning: If you see a message about tasks outside the 1 Jan 1984–31 Dec 2049 range, the export will be blocked. Open the Gantt, find those tasks and correct their dates.
- Inter-project dependency notices: Blue informational banners may appear in Step 1 if your project has inter-project links. These are warnings about automatic constraint adjustments made to the exported file; the original data in Cora PPM is unaffected.
- PMXML format downloads as .xml: Even when you select PMXML, the downloaded file has a
.xmlextension (the server renames it). Open it in Primavera P6. - Checkout with no intention to import: Do not check out if you are exporting purely for reporting purposes. A checked-out project blocks edits for everyone else, and someone will need to check it back in to release the lock.
Project Import
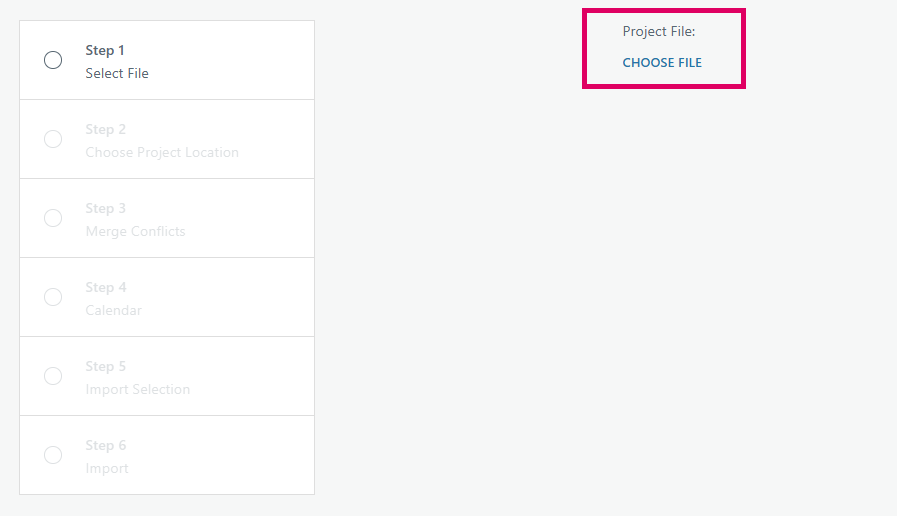
The Project Import Wizard in Cora PPM is a guided, multi-step process that allows users to import a Microsoft Project (MSP) schedule file — typically a .mpp, .xml, or similar project file format — into the Cora PPM system. It is used to create brand-new projects, append tasks to an existing project, replace all tasks in a project, or merge updates back into a project that was previously exported from Cora PPM.
The wizard presents a left-side stepper panel showing up to 12 internal steps (though the user typically sees between 6 and 9 depending on what is being imported). Only relevant steps are shown — steps for mapping Users, Skills, Facilities, Materials, Custom Fields, and Milestone Deliverables appear only when those data types are present in the imported file and are selected for import. The overall step sequence is:
- Select File — Upload the project schedule file.
- Choose Project Location — Decide whether to create a new project, append tasks to the current project, replace existing tasks, or merge with the current project.
- Merge Conflicts — Visible only when merging; shows tasks in the file that differ from what is already on the project.
- Calendar — Map the file's project calendar and any task-level calendars to Cora PPM calendars.
- Import Selection — Choose which elements (Users, Skills, Facilities, Materials, Baselines, Custom Fields, Teams) to import alongside the schedule tasks.
- Map Users / Map Skills / Map Facilities / Map Materials / Field Mapping / Map Milestone Deliverables — Individual mapping steps for each selected resource type.
- Import — Summary screen showing what will be imported before the final import button is clicked.
Step 1 — Select File is the wizard's starting point and gateway. It presents a single "Project File" field backed by a Telerik Async File Upload control (rendered with the label "CHOOSE FILE"). The user browses their local machine for a compatible schedule file and the upload begins immediately on selection. Nothing else in the wizard is accessible until a valid file is uploaded and accepted.
When the user clicks Next after selecting a file, Cora PPM:
- Reads the raw binary from the upload.
- Runs it through a virus/malware scanner.
- Saves it to a temporary location on the server (either a local
MSPFiles\TempMPPUploadsfolder or, when the Azure PaaS feature toggle is on, an Azure Blob Storage container namedmspfiles). - Parses the file using the MPXJ library (via the internal
MSPImportclass) to extract tasks, resources, calendars, baselines, and custom field data. - Validates the file content, checking for circular predecessor references, manually scheduled tasks, split tasks, potential name/duration discrepancies, and duplicate predecessor links — all flagged as pre-import issues visible later.
- Caches all parsed data (tasks, resource table, working exceptions, calendar info, baselines, custom fields) in the Session so subsequent wizard steps do not need to re-parse the file.
- Moves the wizard to Step 2.
If the file fails virus scanning, cannot be parsed, or is unreadable, an error toast is displayed and the wizard remains on Step 1. The Next button on Step 1 is wired to disable the Import button until a file is successfully uploaded; the Import button (final step) is kept disabled at all times except Step 1's file-upload callback.
Cora PPM also detects whether the uploaded file was originally exported from the current project (by checking the embedded ProjectVisionProjectID property), and if so, automatically checks the checkout state and configures the location options on Step 2 accordingly.
Prerequisites and Access
- You must have either the MSP Can Export and Import project security right on the current project, be the Project Owner (Profile ID 40), or hold the Portfolio Manager application-level right.
- A project must be selected (the current Project ID must be set in your session). Without a project context, only the Portfolio Manager right grants access.
- If your system configuration has Add Project Disallowed, the "Create a new project" and "Create outside current project" location options on Step 2 will be disabled; you will only be able to merge or append.
How to Navigate to the Wizard
- Open the target project in Cora PPM.
- Use the project toolbar — look for the Import from Microsoft Project menu option (accessible via the project-level toolbar buttons, often under a schedule or data import section).
- The wizard opens in a panel or modal at
Project_MSP_Import.aspxwithin the current project context.
Step 1 — Select File (the focus of this guide)
Goal: Tell the wizard which schedule file you want to import.
- When the wizard opens, you will see the left-side stepper panel. Step 1 – Select File is highlighted in bold/active style. All other steps are greyed out.
- In the right-hand content panel, you see the field labelled "Project File:" followed by the CHOOSE FILE button (blue-styled).
- Click CHOOSE FILE. Your operating system file picker will open.
- Navigate to and select your Microsoft Project file. Supported formats include
.mppand.xml(MPX/MPXJ-compatible formats). - The file uploads immediately in the background once selected. You will see the filename appear next to the button when the upload is complete.
- Click the Next button (bottom right of the page) to proceed.
What happens behind the scenes when you click Next:
- The file is virus-scanned. If it fails, the wizard stays on Step 1 and shows an error.
- The file is parsed. If it cannot be read (corrupted, wrong format), an error toast appears and you remain on Step 1.
- If the file was previously exported from this project and the project is currently checked out, a warning tells you that the current project is checked out and you can update it with this file.
- If the file was exported from a different project, an error message tells you that you cannot update the current project with it.
- On success, the wizard advances to Step 2 – Choose Project Location.
Tips and Common Pitfalls
- No file selected, clicking Next: If you click Next without selecting a file — and no file has been previously uploaded in the same session — you will see the error: "Invalid file path entered." Always upload a file before clicking Next.
- File already uploaded in same session: If you click Next without re-selecting a file but a file was uploaded earlier in the same session, the wizard will re-use the cached file path from the session and advance. This means accidentally clicking Next twice does not force a re-upload.
- Virus scan failures: If your organisation has virus scanning enabled and the file triggers a detection, the import will be blocked at Step 1.
- Azure vs On-Premises: In cloud (PaaS) deployments, the uploaded file is stored in Azure Blob Storage; in on-premises deployments it goes to the server's
MSPFiles\TempMPPUploadsdirectory. Old temp files (more than 1 day old) are automatically cleaned up on each upload. - Circular references: If your MSP file contains circular predecessor links, a warning panel is shown on Step 2 (not Step 1) identifying the offending tasks. The import can still proceed but the circular links will be removed.
- Pre-import issues: After parsing, the system pre-screens for task name issues, split tasks, 2013 Project lag problems, and duration mismatches. These are surfaced as a clickable "Potential Discrepancies" link on Step 2, not as blockers on Step 1.
- File remains in memory: The parsed file data is cached in the session under keys prefixed with
MPXJ_. This means the file is not re-parsed on each subsequent step — navigation through the wizard is fast. Session data is cleared after a successful import or when you explicitly reset.
Was this article helpful?
That’s Great!
Thank you for your feedback
Sorry! We couldn't be helpful
Thank you for your feedback
Feedback sent
We appreciate your effort and will try to fix the article